7SearchPPC
Go to 7searchppc.com

Click on the “Register” button at the top right corner of the screen and then select the “As an Advertiser” box.
Now, click the “Get Started” button to proceed.
A registration form will appear. Fill it out to complete your registration.

To create your advertiser account, you need to fill in all the required details.
First Name
Last Name
Referral Code (Optional, if you have one.)
Email Address
Phone Number
Messaging Platform
Username/Number
How did you know about us?
Password
Checkbox 1
Check this box to agree to the platform's Terms and Privacy Policy.
Checkbox 2
Check this box to give consent to receive promotional messages and other alerts.
Checkbox 3
Check this box to give consent to receive promotional messages and notifications from 7SearchPPC, including updates, offers, and account alerts.
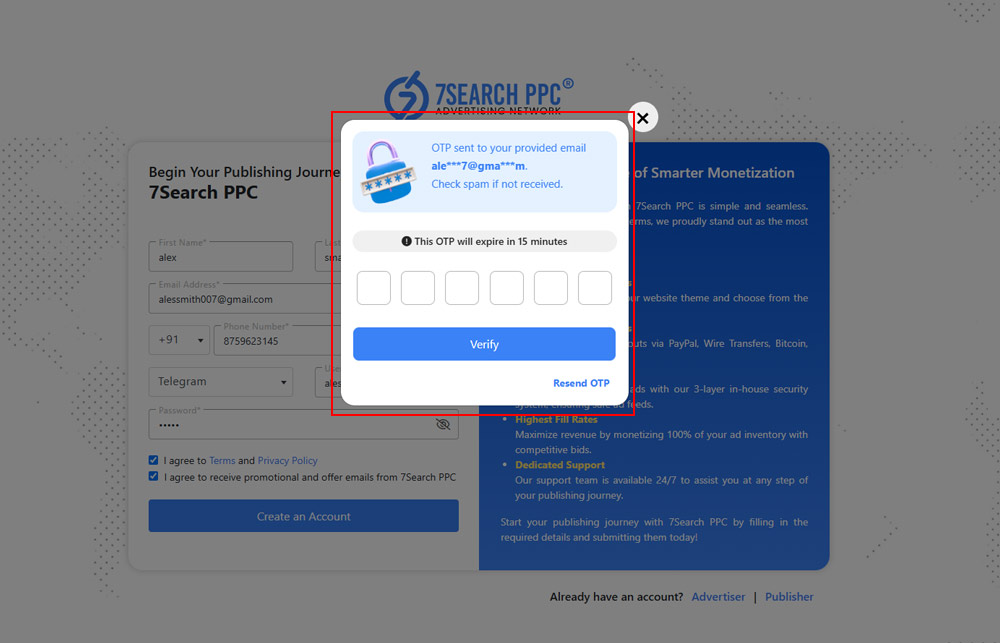
Review all the details and click “Create an Account” to submit your information and verify your email.
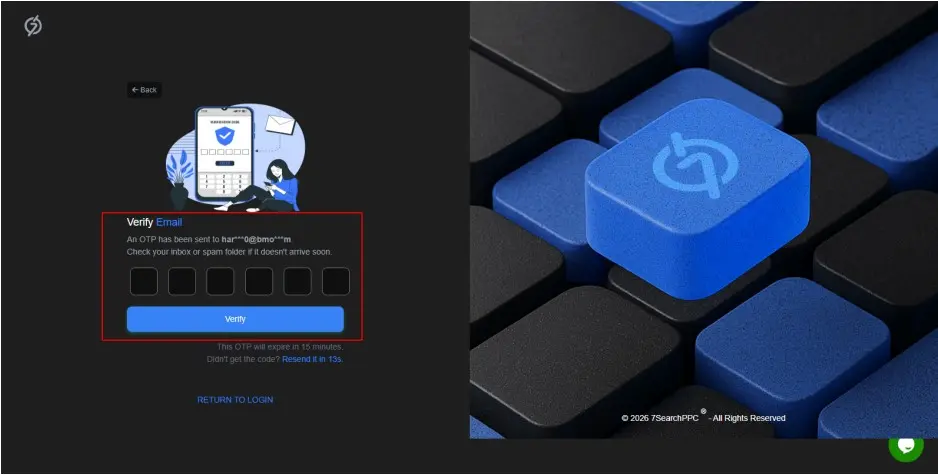
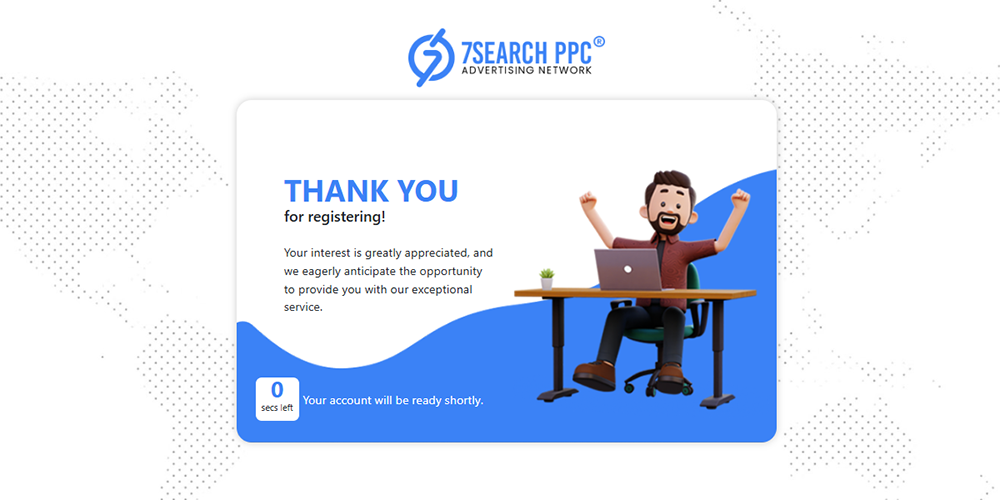
After clicking on “Create an Account” an OTP verification pop-up will appear.
Open your inbox, find an email from 7SearchPPC
Copy the 6-digit OTP
Enter the OTP in the OTP verification pop-up

Click “Verify” to successfully register your account. Once done, you will be redirected to your 7SearchPPC Advertiser Panel.
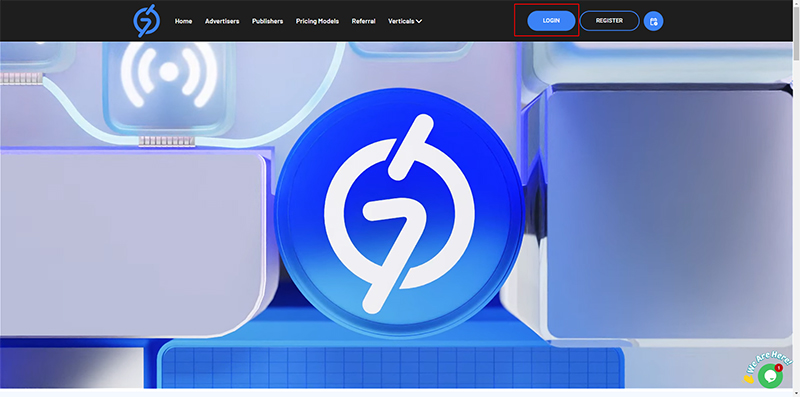
Go to 7searchppc.com
Click on the “Login” button at the top-right corner.
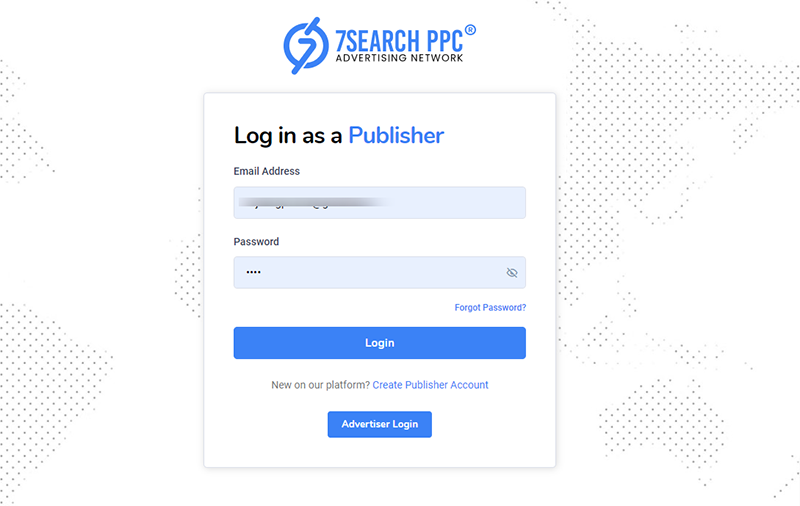
Select “As an Advertiser” and click “Continue.”
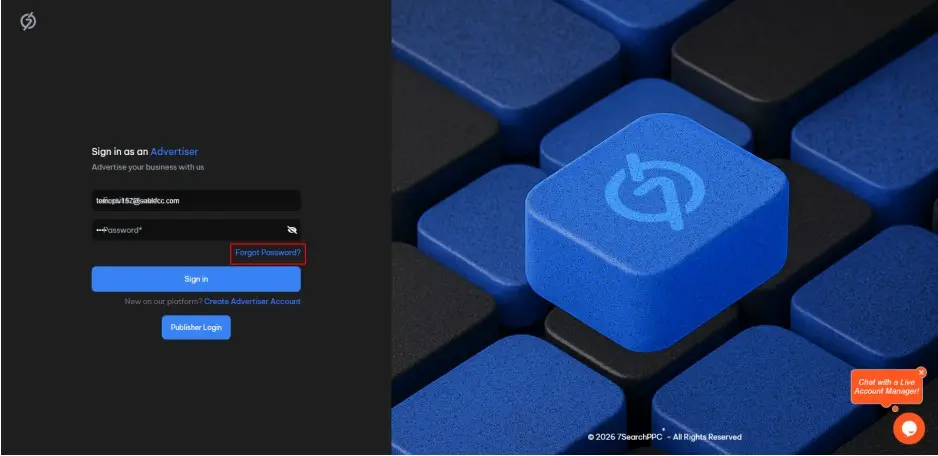
The Sign-In Page will open.

On the sign-in page, provide your “Email ID” and “Password.”
Click on the “Sign in” button.
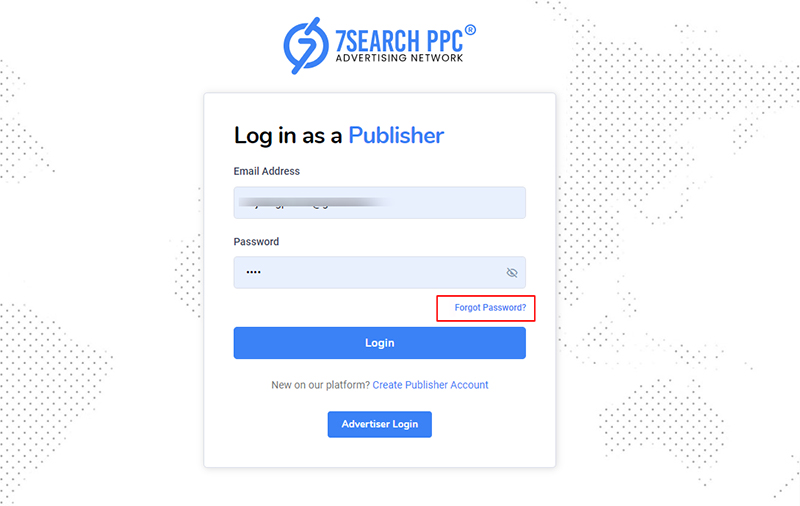
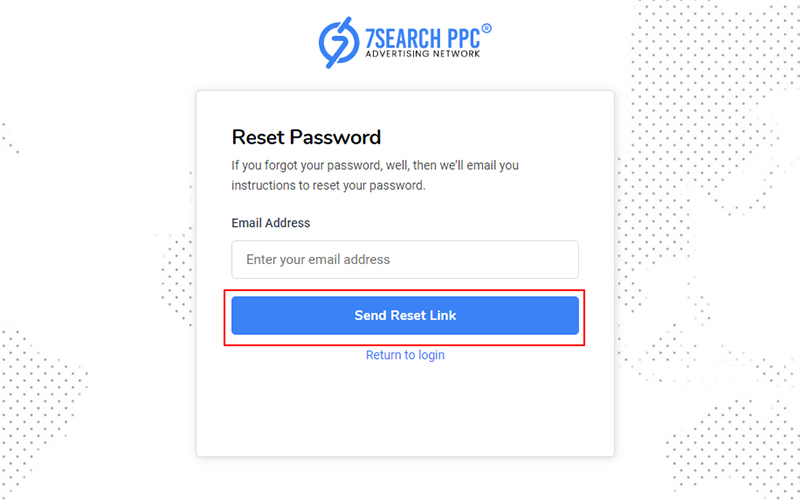
Click on the “Forgot Password?” link on the sign-in page if you have forgotten your password.
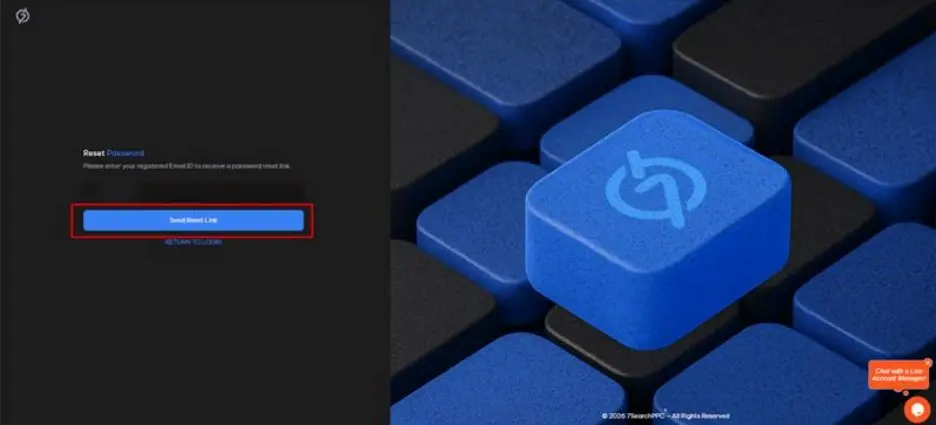
The reset password page will open
Enter your registered Email ID
Click on the “Send Reset Link” button
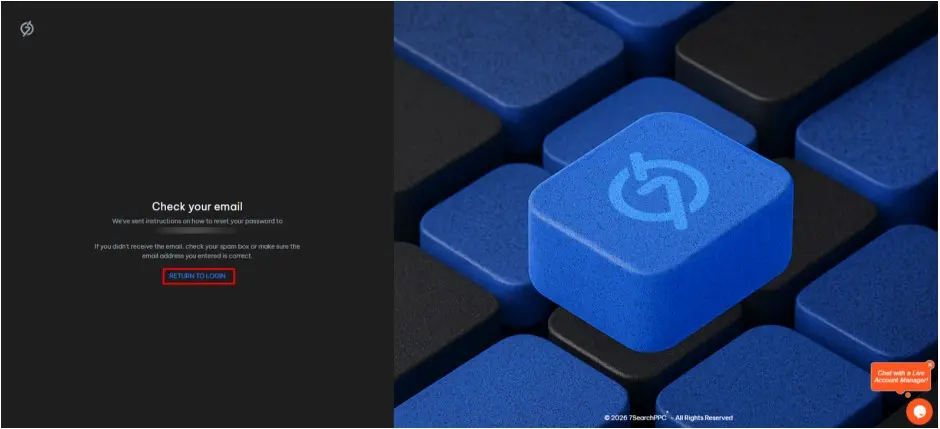
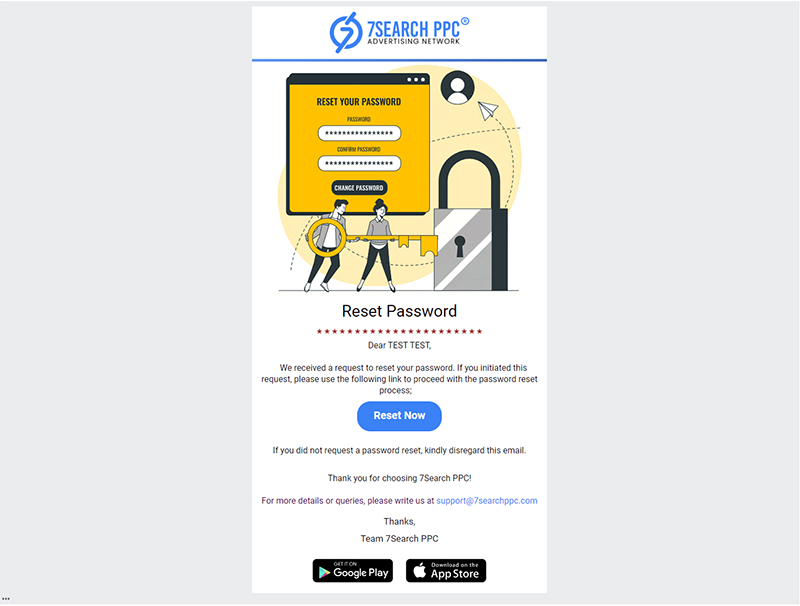
After clicking “Send Reset Link,” you will receive password reset instructions at your registered email address.
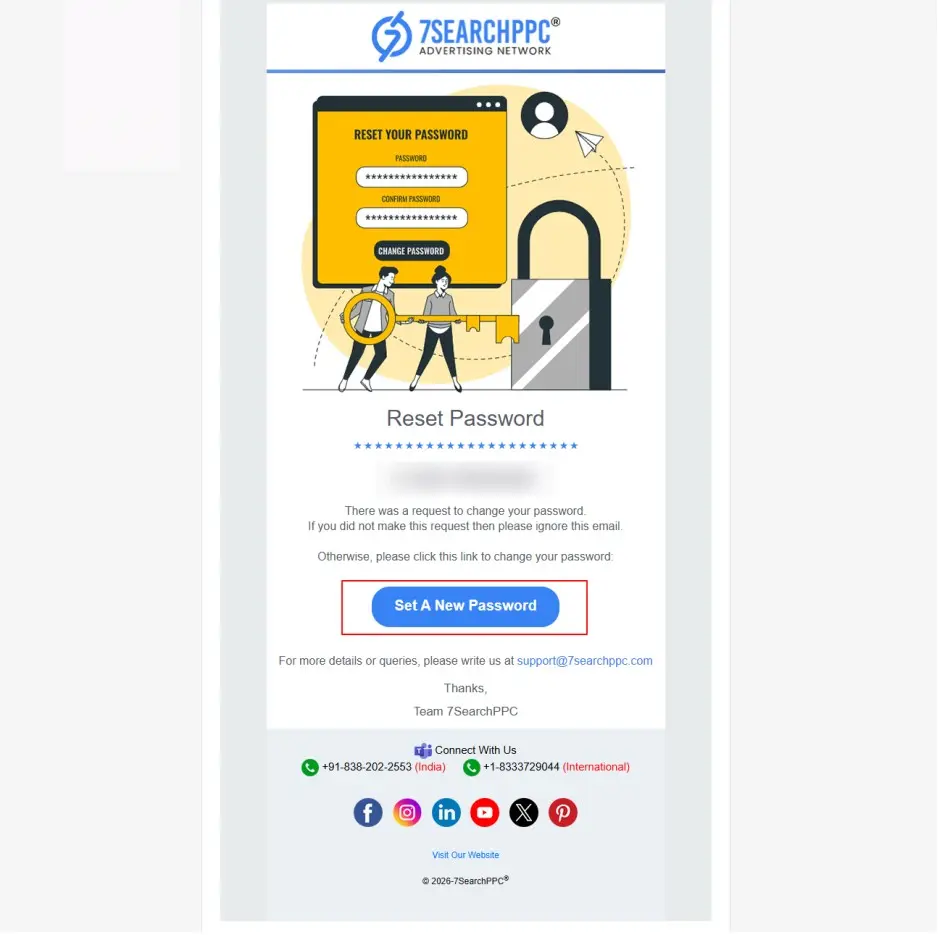
Open your linked Email.
Look for an email from 7SearchPPC with the subject line “Reset Your Password - 7SearchPPC.”
Click on the “SET A NEW PASSWORD” button.
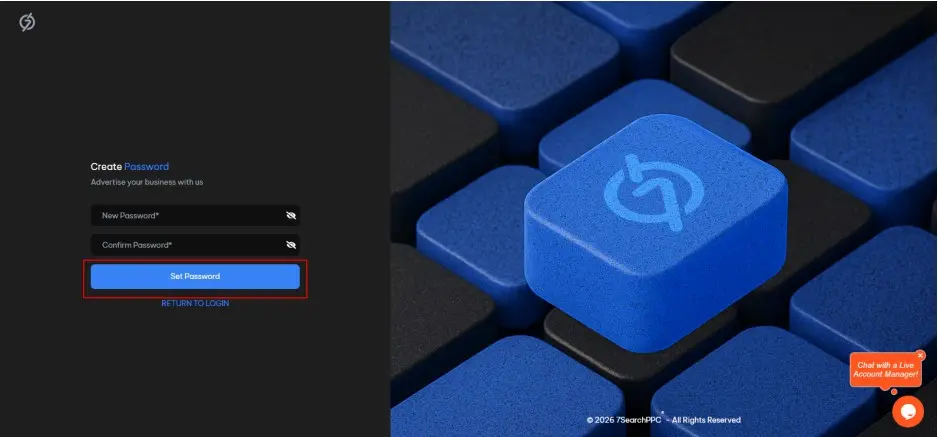
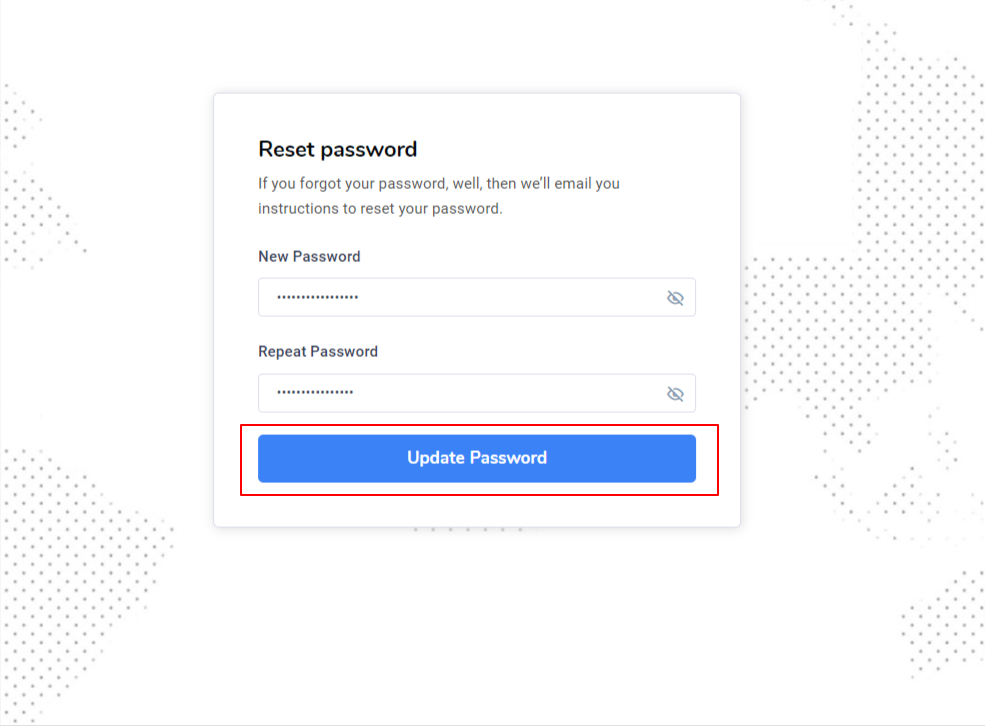
The password reset page will open, where you need to:
Enter a new password
Confirm your new password.
Click on the “Set Password” button.
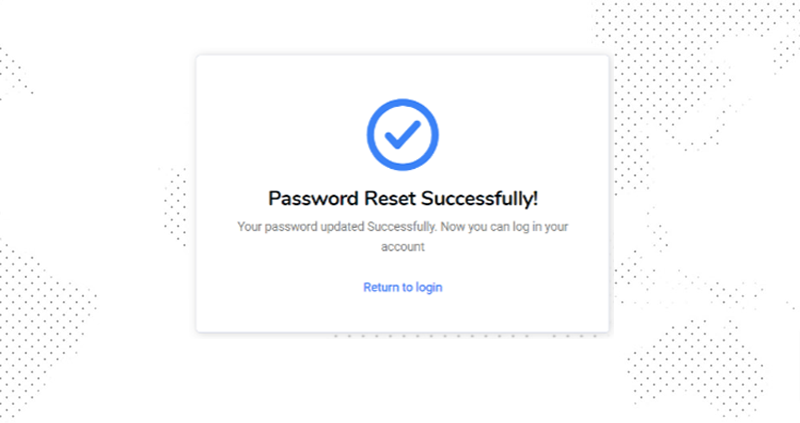
Once done, you will get the following message.
Your Password Updated Successfully!
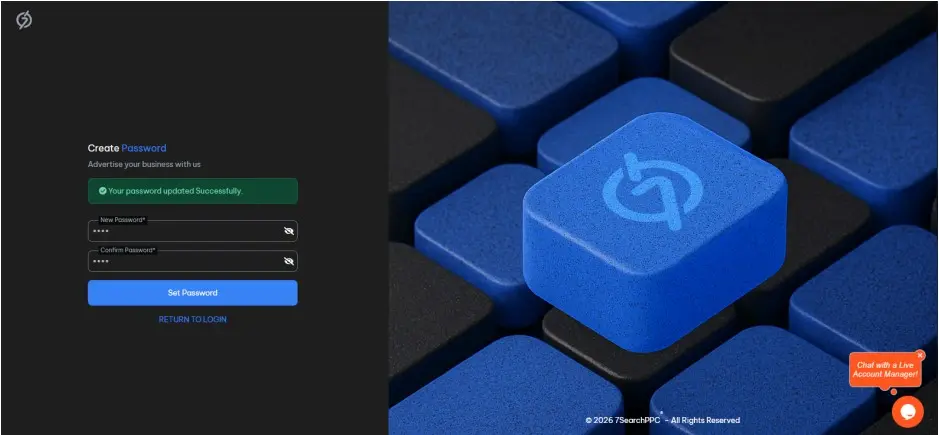
Return to the login page and sign in with your updated password.
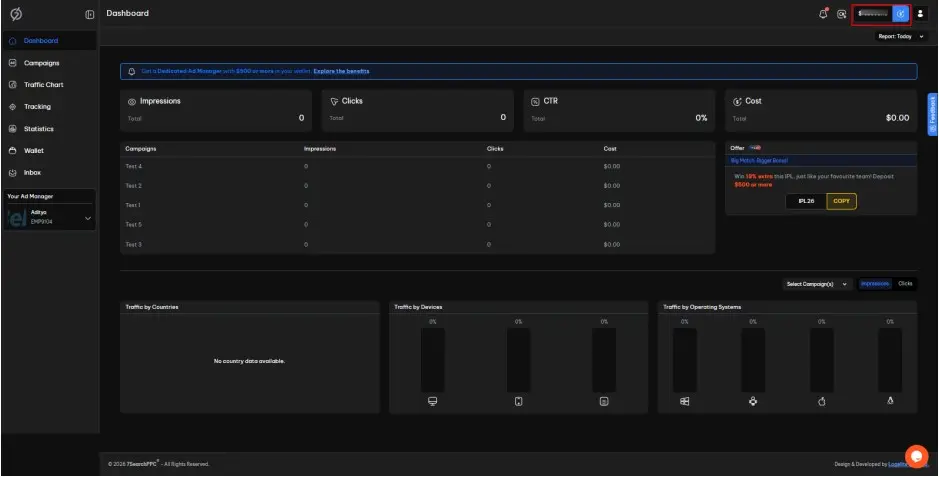
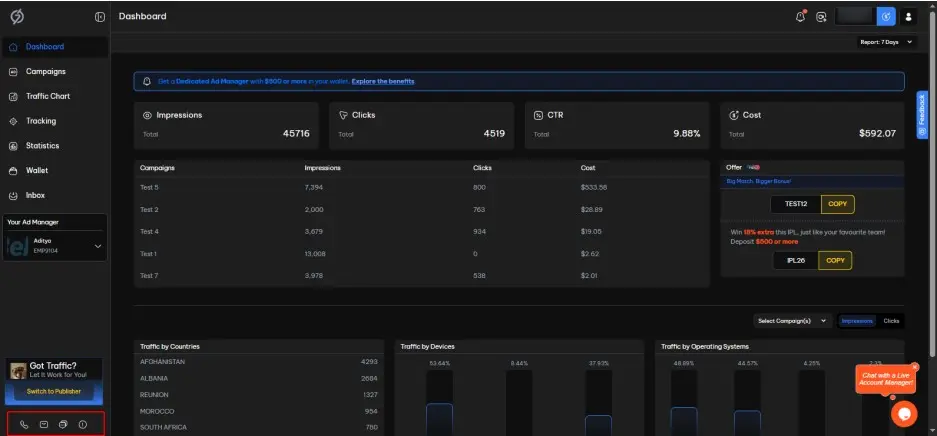
When you sign in to your 7SearchPPC advertiser account, you will see a comprehensive dashboard with top and side navigation bars.
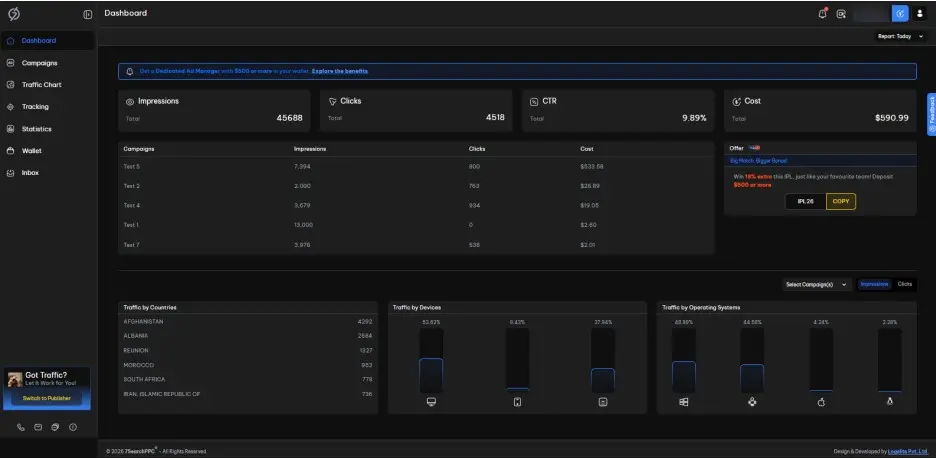
The dashboard includes the following elements:
Filter
Ads Overview
Offer
Top 5 Campaigns
Traffic by Countries
Traffic by Devices
Traffic by Operating Systems
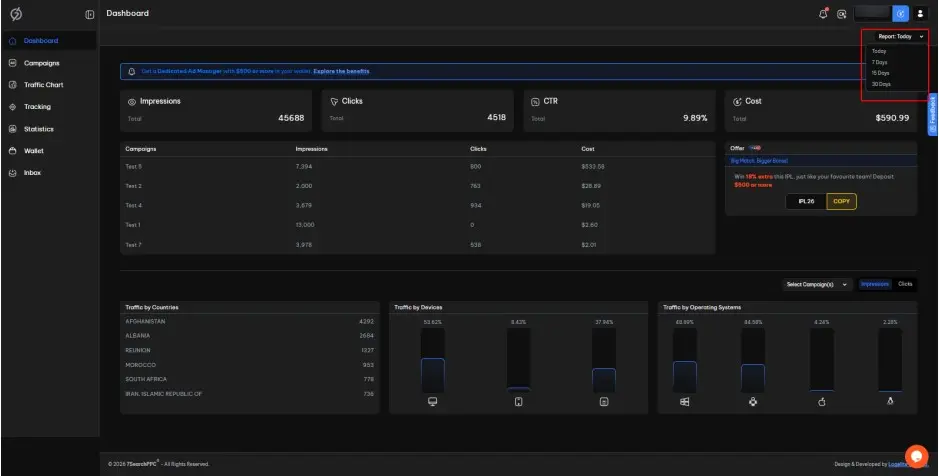
You will see two filters on the dashboard. The first filter is located at the top right, above the main view.
This filter allows you to refine the data displayed on the dashboard.
By default, it shows data for the current day only.
You can choose to view data for the following time ranges:
Today
7 Days
15 Days
30 Days
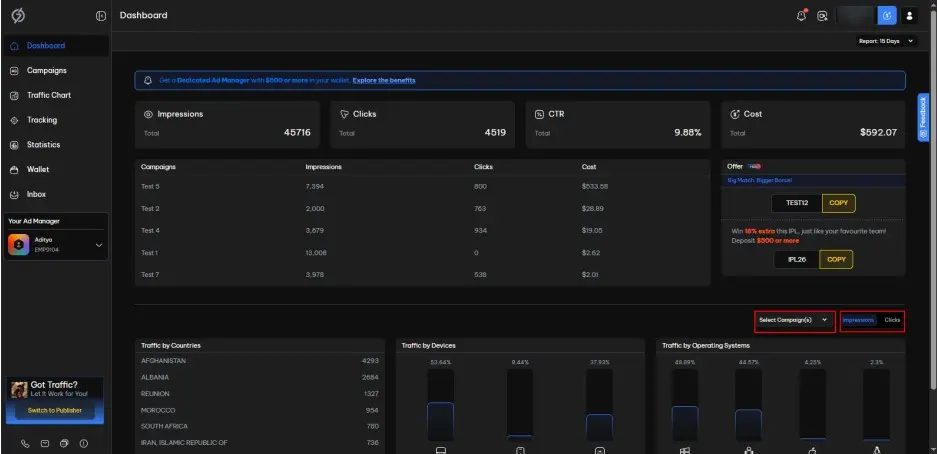
The next filter is located at the bottom right corner of the dashboard.
It helps you filter the data by campaign. Next to the filter, you can toggle between clicks and impressions. This is applicable to countries, devices, and operating systems.

This section will show you the following.
Impressions
Total number of impressions on all your campaigns.
Clicks
Total number of clicks on all your campaigns.
CTR
Total click-through rate across all your campaigns.
Cost
Total amount spent on all your campaigns.
*The duration of the data will be determined by the filter.
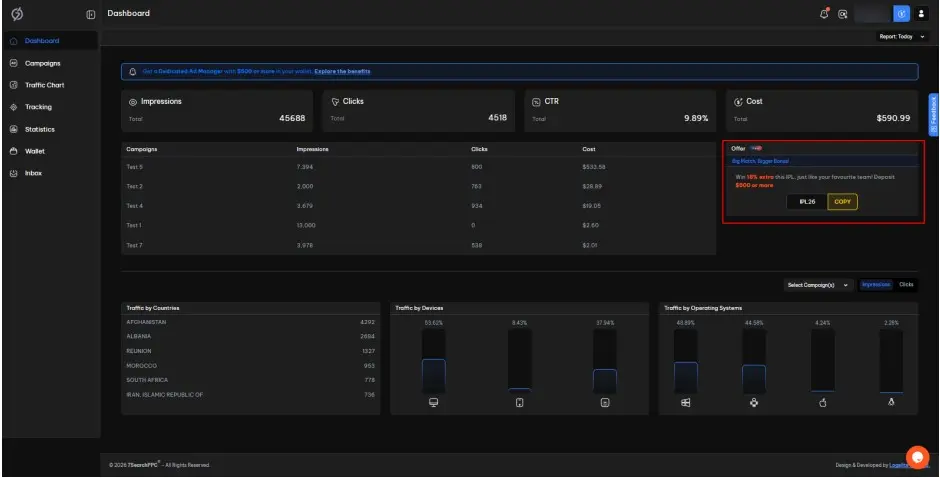
You will get exclusive coupons and codes here.
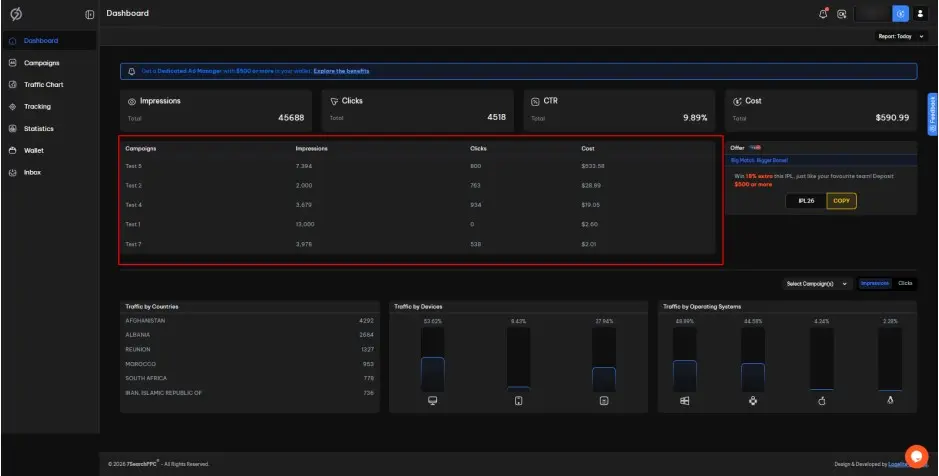
This section shows your top five campaigns based on performance.
Campaigns
Name of the campaign.
Impressions
Total impressions during the selected period.
Clicks
Total clicks during the selected period.
Cost
Total cost incurred during the selected period.
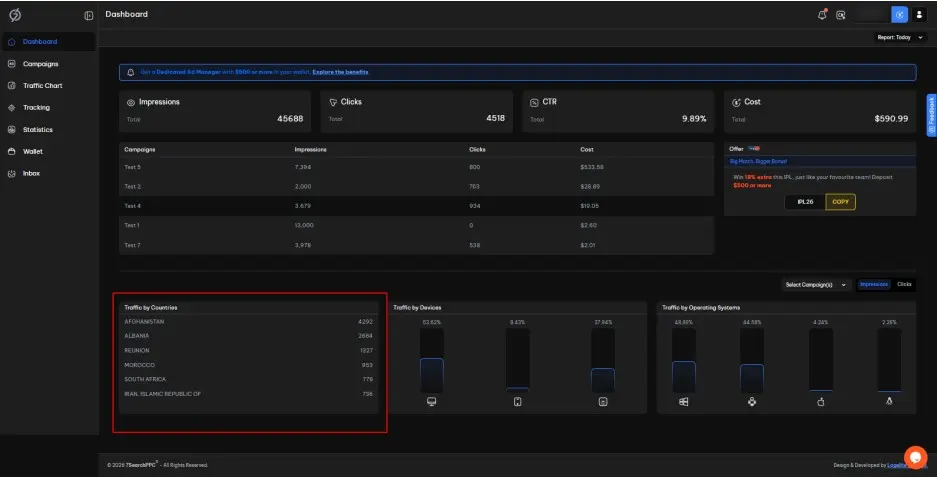
In this section, you can view how much traffic you are receiving from different countries.
The data is sorted from highest to lowest.
You can see the following information:
Country name
Traffic
Traffic includes the number of impressions/clicks.
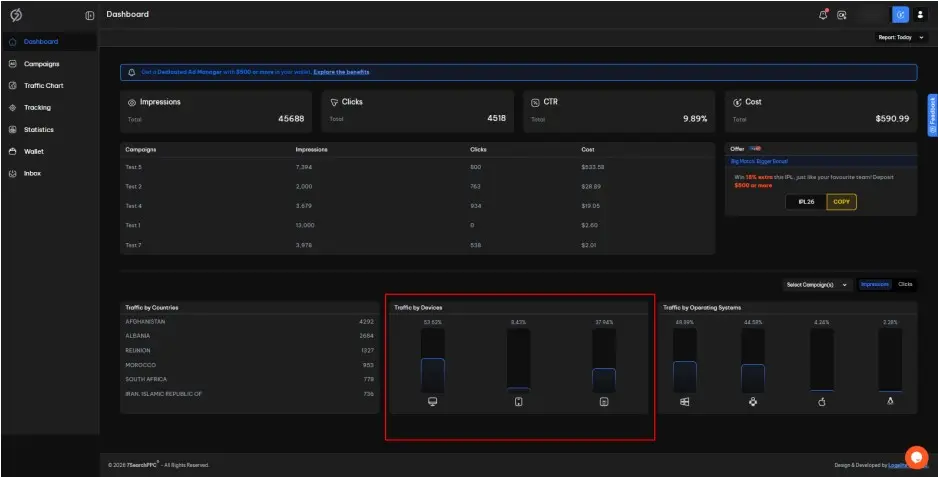
This section will show how much traffic you are getting from different devices.
You can view the traffic percentage you are receiving from :
Desktop/Laptop
Mobile
Tablet
You will also get a graphical representation of the traffic in the form of a bar graph.
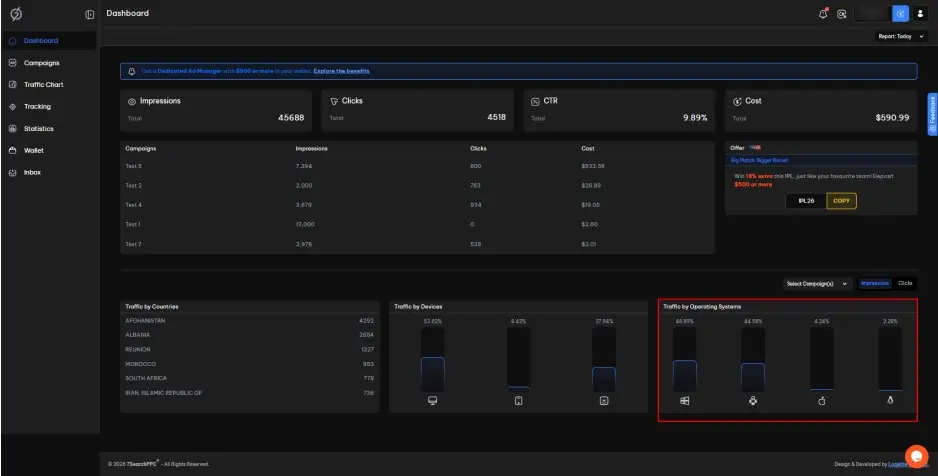
This section shows how much traffic you are receiving from different operating systems.
You can view the percentage of traffic coming from :
Windows
Apple
Linux
Android
It also provides a graphical representation of the traffic in the form of a bar graph.
You can find the 7SearchPPC logo in the top bar.
Clicking it will take you back to the dashboard from any section of the advertiser panel.
Next to the logo, you will find a sidebar toggle.
You can click on it to expand or collapse the Sidebar Navigation.
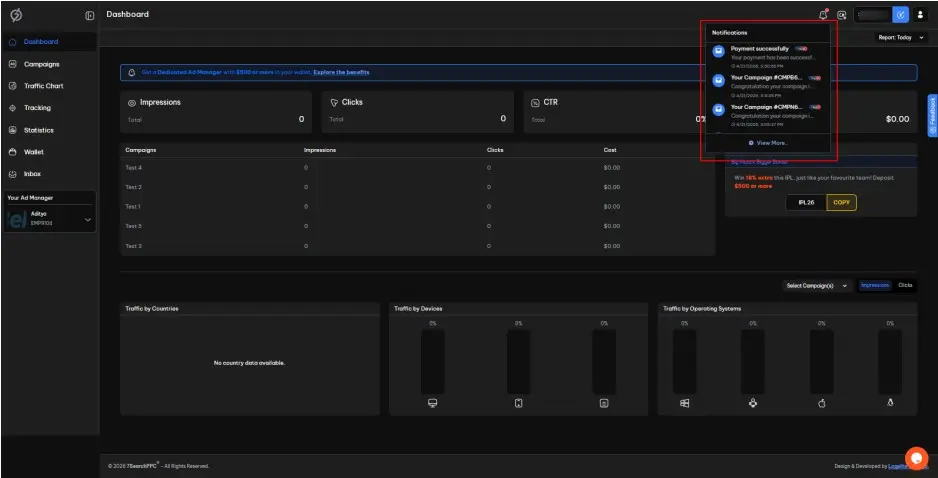
The Notifications icon is located in the top-right corner of the advertiser dashboard.
Click the Notifications icon to view the latest updates.
It helps you stay informed about important account activities and system alerts in real time.
Next to the notification icon, you will see the “Meet” (Schedule a Meeting) icon.
Click the “Meet” icon to schedule a meeting directly from the dashboard.
Use it to connect with the support team at your preferred time.
In the top-right section of the navigation bar, you’ll find the “Available Balance” display along with the “Add Fund” icon.
This area shows the current amount available in your wallet.
Click on it to access your wallet and add funds to your 7SearchPPC account.

The last icon on the top bar is the “User Profile”. Click on it to view the following options:
User Name
User ID
Support Pin
Profile Logs
Login Activity
Change Password
Logout
On the left side of your dashboard, you will find various sections listed in the sidebar menu. If you are using a small-screen device, this section might not be visible. In that case, click on the sidebar toggle icon in the top-left corner to view the sidebar menu.
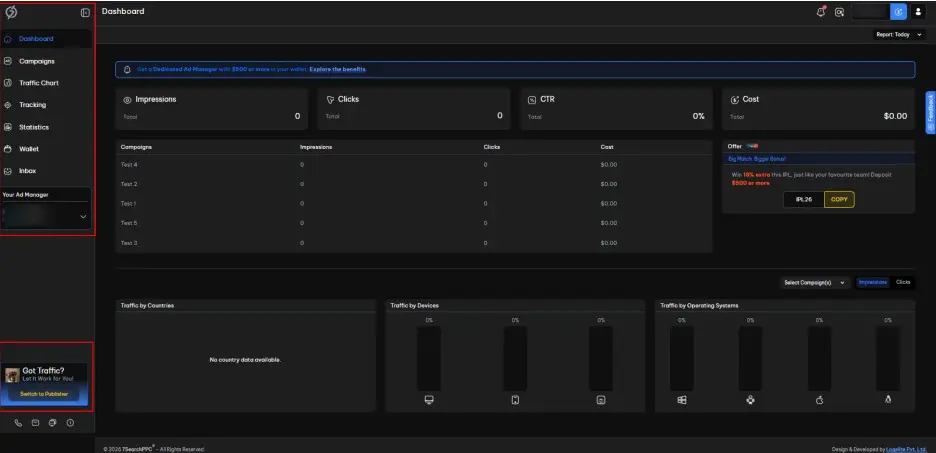
The sidebar menu includes the following options:
Dashboard
Campaigns
Traffic Chart
Tracking
Statistics
Wallet
Inbox
Your Ad Manager (visible only to eligible users)
Become a Publisher / Switch to Publisher
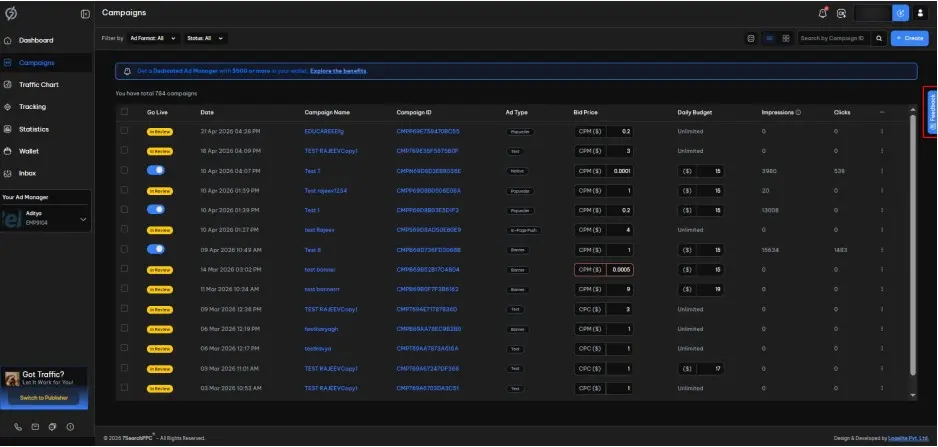
You can manage and create new ad campaigns from this section
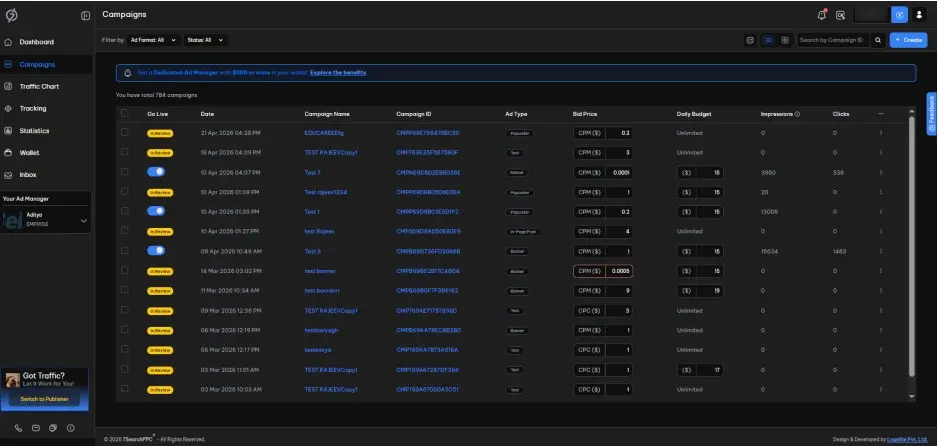
You can search for a specific campaign using the Campaign ID.
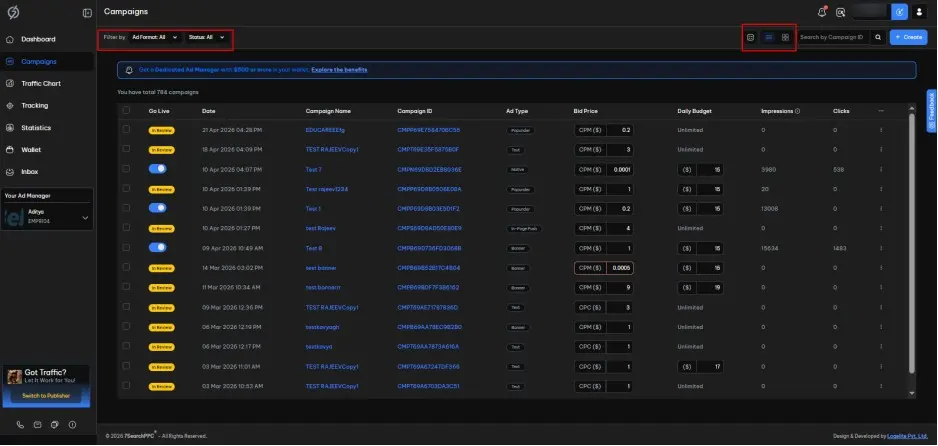
You can filter your campaigns by Ad Format, Status, and Select Columns to Display, and view them in List View or Grid View. By default, all campaigns are displayed in the campaign list.
Using this filter, you can sort your campaigns based on ad format:
All
Text Ads
Banner Ads
In-Page Push Ads
Native Ads
Popunder Ads
You can filter your campaigns by status.
All
In Review
Active
On Hold
Paused
Suspended
You can choose from the following options to display in your campaign list:
Go Live
Date
Campaign Name
Campaign ID
Ad Type
Bid Price
Daily Budget
Impressions
Clicks
CTR
Countries
Conversions
Earnings
Scheduled
You can view campaigns in a simple, scrollable list format for quick scanning and management.
You can click it to view campaigns in a visual card layout, making it easier to browse and compare campaign details at a glance.
On the right-hand side of the screen, you will find the Feedback option. Click on this option to open the feedback panel.
In this section, you can:
Share your suggestions or ideas for new features.
Report any issues or bugs you encounter.
Provide general comments about your experience.
Upload files with your feedback.
After entering your feedback, submit it through the panel.
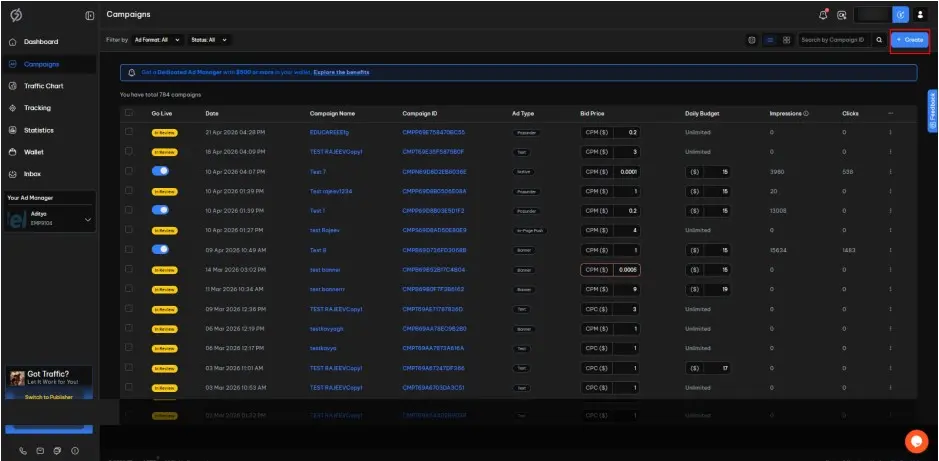
On the right side of the Campaigns section, you will see the “+ Create” button. Click on it to start creating your ad campaign.
You will need to follow these steps to create a campaign.
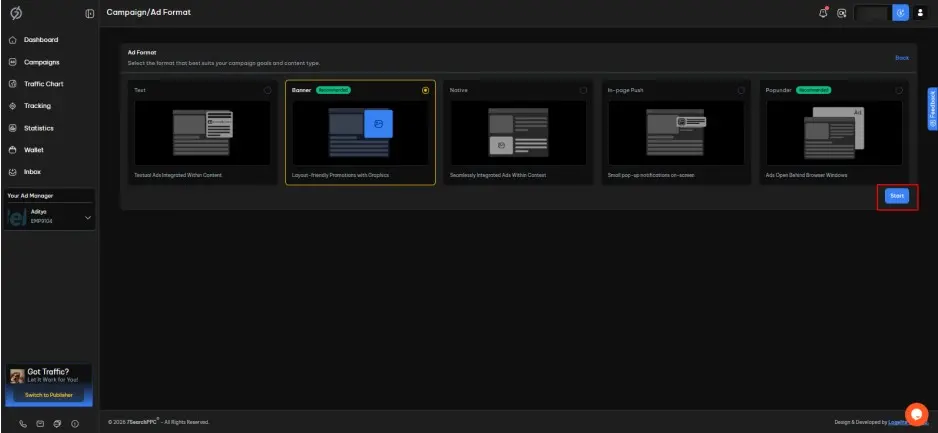
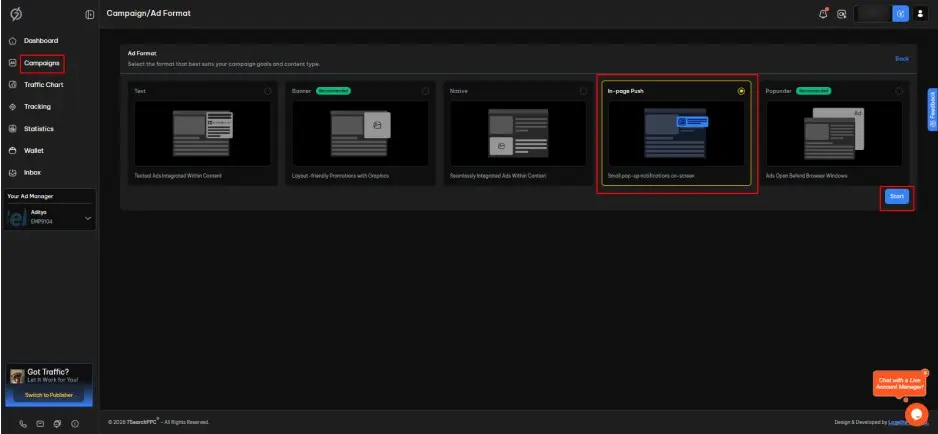
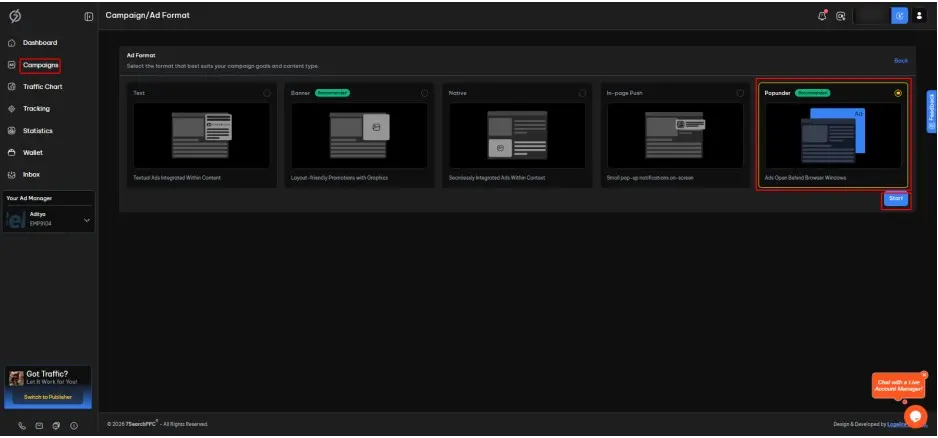
Choose the ad format you want to use for your campaign from the available options.
Text
Banner
Native
In-page Push
Popunder
Each format represents a different way your ad will appear to users. After selecting your preferred ad format, click Start to proceed.
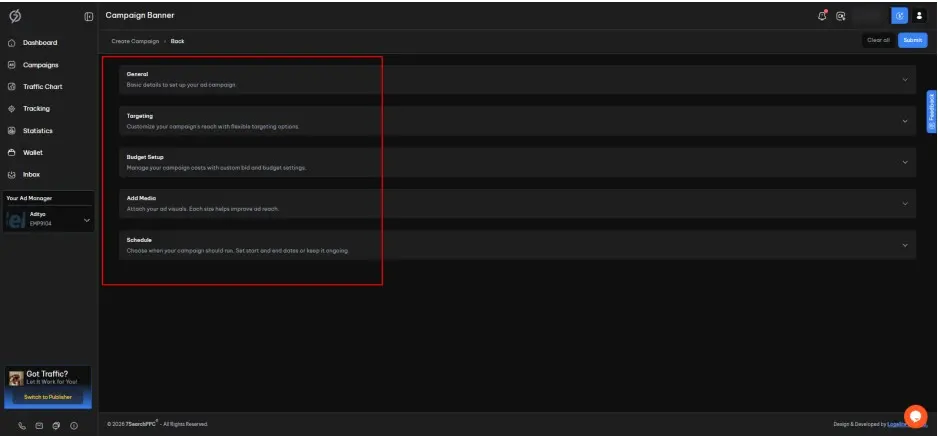
Once you select the ad format and click “Start”, the Campaign Settings page will open, where you need to fill in the following sections.
General
Targeting
Budget Setup
Add Media
Schedule
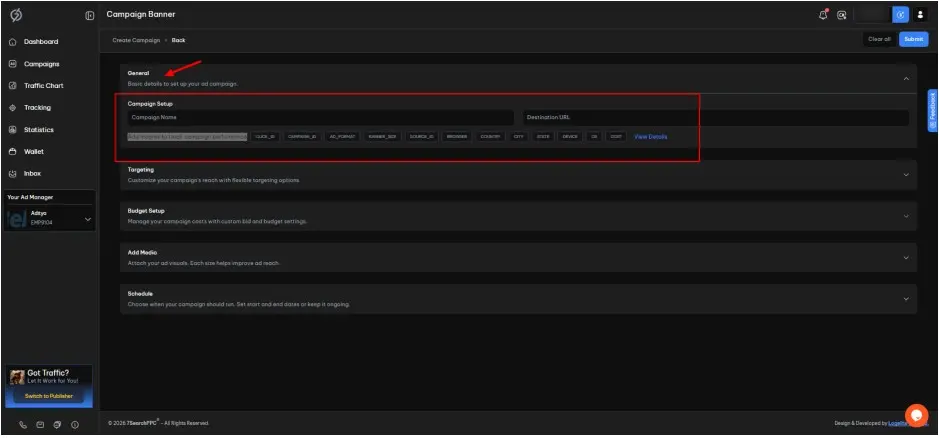
Click on the General section to set up the campaign with the following details:
Campaign Name
Destination URL
Available Macros (used to track campaign performance)
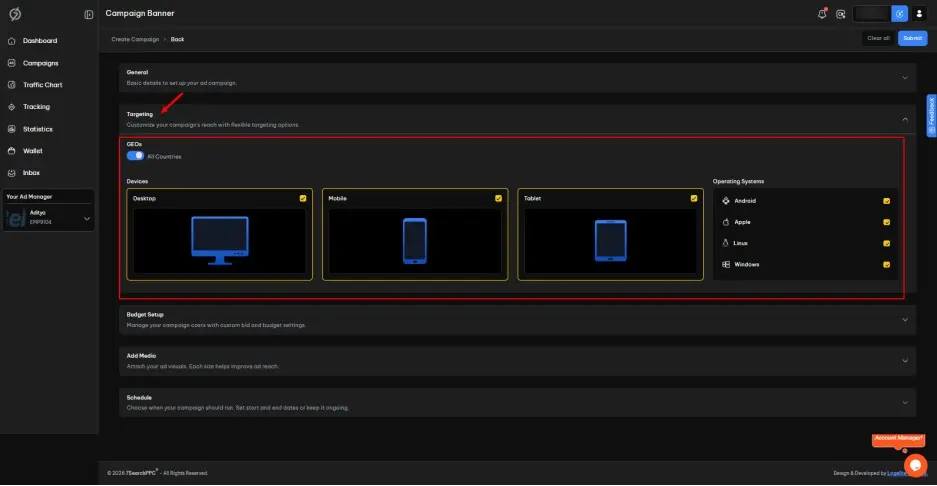
Now, click on the Targeting section to set up your ad targeting based on the following options.
GEOs
By default, all countries are selected.
You can turn it off and manually choose the countries where you want to run your ad campaign.
You may select one or multiple countries from the list.
Devices
By default, all devices are selected.
You can choose to run your ad campaign on all devices or select one or more of the following:
Desktop/Laptop
Tablet
Mobile
Operating Systems
By default, all OS are selected.
You can choose whether to run your ad campaign on all operating systems or select one or more of the following:
Android
Apple
Linux
Windows
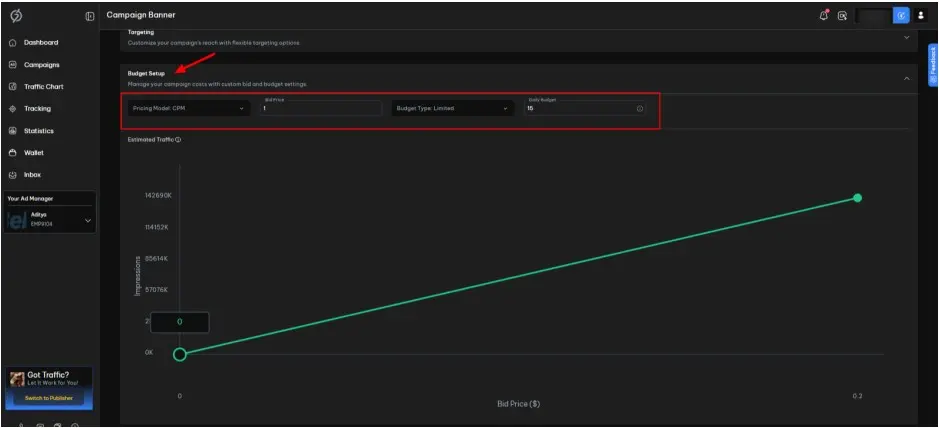
After setting up the targeting, proceed to the Budget Setup section. Fill in or select the details as you prefer.
Pricing Model
Defines the pricing model of your campaign (e.g., cost per click or cost per mille).
Bid Price
Specifies the maximum amount you are willing to pay per measurable action.
Budget Type
Unlimited: Allows unrestricted spending without a predefined cap.
Limited: Restricts spending to a defined budget limit (Minimum daily budget limit is $15).
Below, you can see the Estimated Traffic graph shows a projection based on the selected configuration.
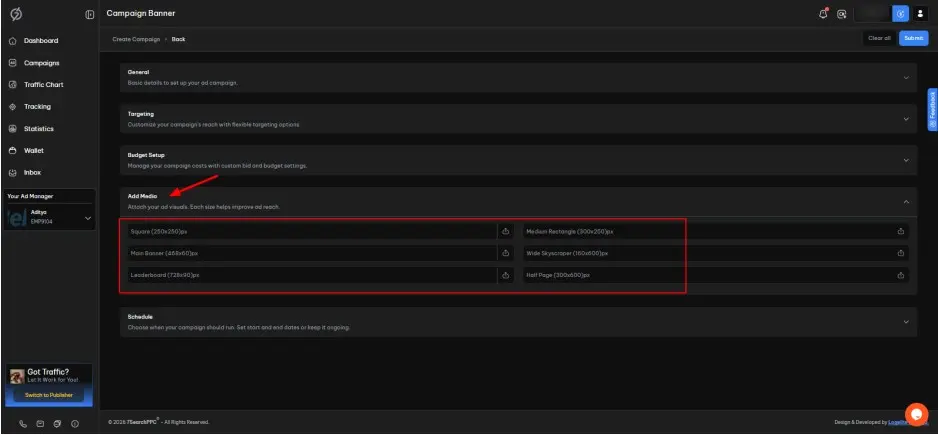
Click on the Add Media section, attach your ad creatives, and proceed to the next section.
Note: Ad dimensions and options may vary depending on the ad format you have chosen. For this campaign settings step, we have chosen the banner ad format for demonstration purposes.
In this section, you will see two options:
When Approved: The campaign will be launched immediately after approval.
On Schedule: The campaign will be launched at a predefined date and time. You will need to select the time zone, date range, and time.
Carefully review the Campaign Settings, then click Submit. Your campaign will enter the review process and go live once approved, according to your campaign settings.
To create a Text Ad Campaign, go to “Campaigns” in the sidebar of your dashboard and click “+ Create”. Select “Text Ad Format” as your preferred option, then click “Start” and follow the steps provided.
Click on the General section and fill in the following fields:
Campaign Name
Destination URL
Available Macros (used to track campaign performance)
Ad Title
Ad Description
Next, go to the Targeting section and configure your ad targeting using the following options:
GEOs
Devices
Operating Systems
Note: By default, all countries, device types, and operating systems are selected.
Proceed to the Budget Setup section and configure the following:
Pricing Model (CPC or CPM)
Bid Price
Budget Type (Unlimited or Limited)
Finally, go to the Schedule section. You can either:
Launch the ads immediately upon approval, or
Schedule them by selecting a predefined date and time.
Review your text ad campaign settings, then click Submit. It will be reviewed and go live (based on your ad scheduling configuration) once approved.

To create a Banner Ad Campaign, go to “Campaigns” in the sidebar of your dashboard and click “+ Create”. Select “Banner Ad Format” as your preferred option, then click “Start” and follow the steps provided.
Click on the General section and fill in the following fields:
Campaign Name
Destination URL
Available Macros (used to track campaign performance)
Next, go to the Targeting section and configure your ad targeting using the following options:
GEOs
Devices
Operating Systems
Note By default, all countries, device types, and operating systems are selected.
Proceed to the Budget Setup section and configure the following:
Pricing Model (CPC or CPM)
Bid Price
Budget Type (Unlimited or Limited)
Select the ‘Add Media’ section to attach your ad creatives. In this section, you can choose your preferred option from the available dimensions, such as:
Square (250 × 250 px)
Medium Rectangle (300 × 250 px)
Main Banner (468 × 60 px)
Wide Skyscraper (160 × 600 px)
Leaderboard (728 × 90 px)
Half-page (300 × 600 px)
Note: In this section, you must upload at least one image. The creative should be in JPG, JPEG, GIF, or PNG format.
Finally, go to the Schedule section. You can either:
Launch the ads immediately upon approval, or
Schedule them by selecting a predefined date and time.
Review your banner ad campaign settings, then click Submit. It will be reviewed and go live (based on your ad scheduling configuration) once approved.
To create a Native Ad Campaign, go to “Campaigns” in the sidebar of your dashboard and click “+ Create”. Select “Native Ad Format” as your preferred option, then click “Start” and follow the steps provided.
Click on the General section and fill in the following fields:
Campaign Name
Destination URL
Available Macros (used to track campaign performance)
Ad Title
Next, go to the Targeting section and configure your ad targeting using the following options:
GEOs
Devices
Operating Systems
Note: By default, all countries, device types, and operating systems are selected.
Proceed to the Budget Setup section and configure the following:
Pricing Model (CPC or CPM)
Bid Price
Budget Type (Unlimited or Limited)
Select the “Add Media” section to attach your ad creative. In this section, choose the following ad dimension:
Square (250 × 250 px)
Note: The creative should be in JPG, JPEG, GIF, or PNG format.
Finally, go to the Schedule section. You can either:
Launch the ads immediately upon approval, or
Schedule them by selecting a predefined date and time.
Review your native ad campaign settings, then click “Submit”. It will be reviewed and go live (based on your ad scheduling configuration) once approved.
To create an In-Page Push Ad Campaign, go to “Campaigns” in the sidebar of your dashboard and click “+ Create”. Select “In-Page Push Ad Format” as your preferred option, then click “Start” and follow the steps provided.
Click on the General section and fill in the following fields:
Campaign Name
Destination URL
Available Macros (used to track campaign performance)
Ad Title
Ad Description
Next, go to the Targeting section and configure your ad targeting using the following options:
GEOs
Devices
Operating Systems
Note: By default, all countries, device types, and operating systems are selected.
Proceed to the Budget Setup section and configure the following:
Pricing Model (CPC or CPM)
Bid Price
Budget Type (Unlimited or Limited)
Select the “Add Media” section to attach your ad creative. In this section, choose an ad type:
Classic
Social
Note: The creative must be in JPG, JPEG, or PNG format. The ad dimensions should be square (100 × 100 px).
Finally, go to the Schedule section. You can either:
Launch the ads immediately upon approval, or
Schedule them by selecting a predefined date and time.
Review your in-page push ad campaign settings, then click Submit. It will be reviewed and go live (based on your ad scheduling configuration) once approved.
To create a Popunder Ad Campaign, go to “Campaigns” in the sidebar of your dashboard and click “+ Create”. Select “Popunder Ad Format” as your preferred option, then click “Start” and follow the steps provided.
Click on the General section and fill in the following fields:
Campaign Name
Destination URL
Available Macros (used to track campaign performance)
Next, go to the Targeting section and configure your ad targeting using the following options:
GEOs
Devices
Operating Systems
Note: By default, all countries, device types, and operating systems are selected.
Proceed to the Budget Setup section and configure the following:
Pricing Model (CPM)
Bid Price
Budget Type (Unlimited or Limited)
Finally, go to the Schedule section. You can either:
Launch the ads immediately upon approval, or
Schedule them by selecting a predefined date and time.
Review your popunder ad campaign settings, then click Submit. It will be reviewed and go live (based on your ad scheduling configuration) once approved.
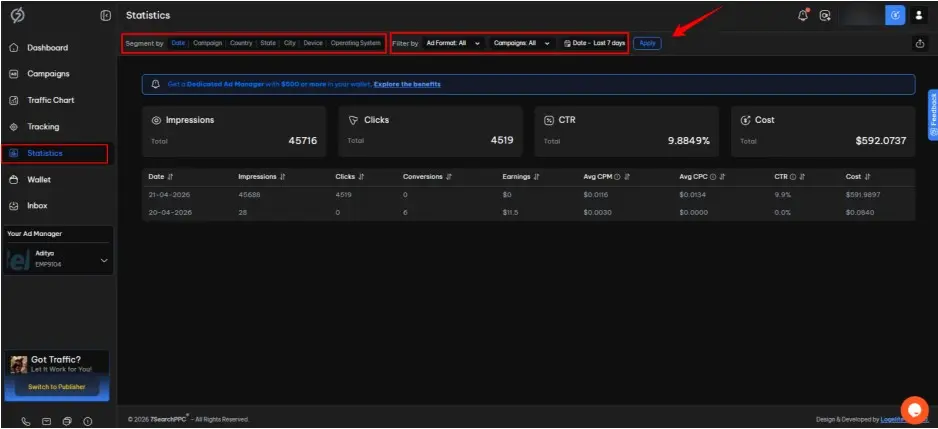
The Statistics section provides a comprehensive overview of your campaign performance, allowing you to analyze data across multiple dimensions and make informed optimization decisions.
To access this feature:
Navigate to the left-hand sidebar.
Click on “Statistics”.
This will open the Statistics dashboard, where all performance data is displayed in a structured format.
At the top of the Statistics page, you will find the Segment by option. This feature allows you to break down your data by various dimensions to gain deeper insights. Available segment options include:
Date
Campaign
Country
State
City
Device
Operating System
The Filter By option enables you to refine the displayed data based on specific criteria. This helps you focus only on relevant performance metrics.
Available filters include:
You can filter performance data by the following ad formats:
Text
Native
Banner
In-Page Push
Popunder
By default, “All” ad formats are selected, displaying combined data across all formats.
In this filter, you can select a Campaign ID to view statistics specific to that campaign. By default, “All” campaigns are selected, displaying combined data across all your ad campaigns.
In this filter, you can define a date range to analyze performance over a specific period, such as:
Today
Yesterday
Last 7 Days
This Week
Last 30 Days
This Month
Custom
By default, the statistics for the Last 7 Days are shown.
On the right side of the Date filter, you can see an "Apply" button. It will work after you choose a "Filter By" option—you need to click it for the filter to be applied.
To initiate postback tracking, click on the ‘Tracking’ section located in the left sidebar of your dashboard.
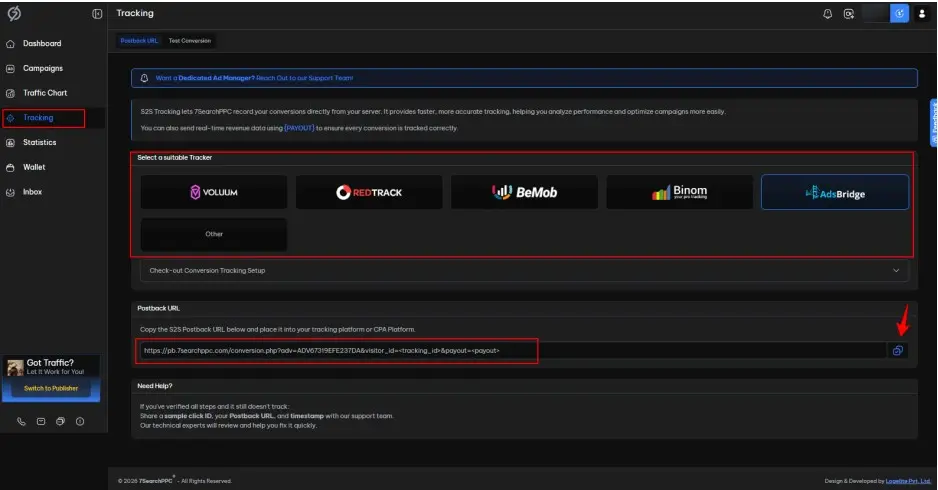
After clicking on the ‘Tracking’ section, you will be taken to a page where you need to follow the given steps.
Select Your Tracker
Choose the tracker you are using to track your campaigns.
Copy the Postback URL
Scroll down to locate and copy the Postback URL for your selected tracker.
For detailed setup instructions specific to each tracker, please refer to the Full Postback Integration Guide.

To test the conversion, follow the steps below:
Navigate to the sidebar menu of your dashboard and select Tracking.
Click on the Test Conversion tab.
Paste the campaign URL you copied from the tracker into the Test Conversion field.
Click the Test Conversion button to execute the test.
After clicking the Test Conversion button, you will be redirected to the conversion page.
Complete the desired action, such as a simple signup, deposit, or payment.
Once the required action is completed, return to the 7SearchPPC dashboard and open the Tracking page. If the tracking setup is configured correctly, the conversion will be recorded on the dashboard.
| Macro | Definition / Description | Example Value |
|---|---|---|
| {click_id} | A unique identifier is assigned to each click. Used for tracking and attribution purposes. | CLK202509276D080 |
| {campaign_id} | The ID of the advertising campaign that generated the click. Helps identify which campaign the traffic came from. | CMP000000000000 |
| {ad_format} | Specifies the format of the ad clicked, such as banner, native, popunder, in-page push, or text. | Banner |
| {source_id} | The traffic source or publisher ID that sent the visitor. Used to attribute performance to a specific source or partner. | 7SWB968D79718500 |
| {browser} | The web browser the user was using when they clicked the ad. | Chrome |
| {country} | The country of the visitor, usually determined via IP geolocation. | US |
| {city} | The city of the visitor. | New York |
| {state} | The state or region of the visitor. | New York |
| {device} | The type of device used by the visitor. | Mobile, Desktop, or Tablet |
| {os} | The operating system of the user's device. | Android, Windows, Apple |
| {cost} | The cost of the click, as tracked by the platform. | 0.05 |
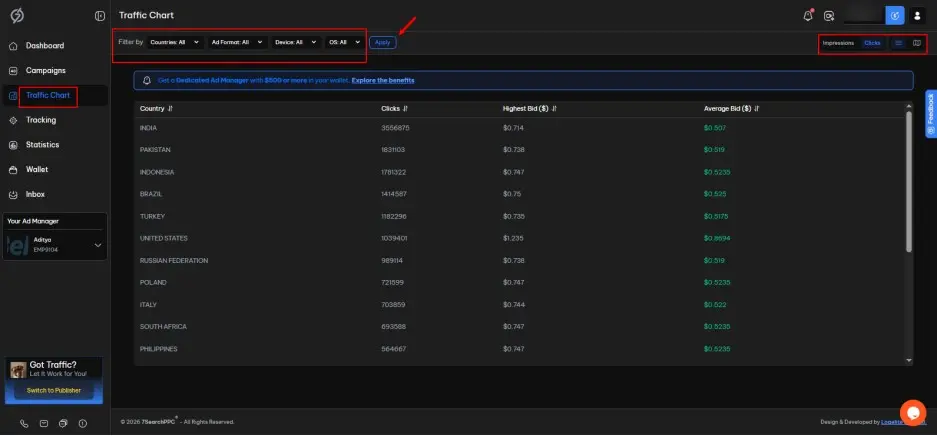
This section provides information about estimated traffic. You can use the available filters to refine the data.
By Countries
View traffic from a specific country.
By Ad Format
View traffic by specific ad format.
By Device
View traffic by device type.
By OS
View traffic by operating system.
After selecting your filters, click the “Apply” button to view the results. By default, all countries, ad formats, device types, and operating systems are selected.
On the right side of this section, you can see two toggles:
Toggle 1
Impressions
Clicks
Toggle 2
List View
Map View
You can use the toggles to switch between Impressions and Clicks, and between List View and Map View.
To manage payments, add funds, and check your transaction history, click on the "Wallet" section available in the left sidebar of your dashboard. After clicking on it, the Wallet Page will open, where you can view various sections.
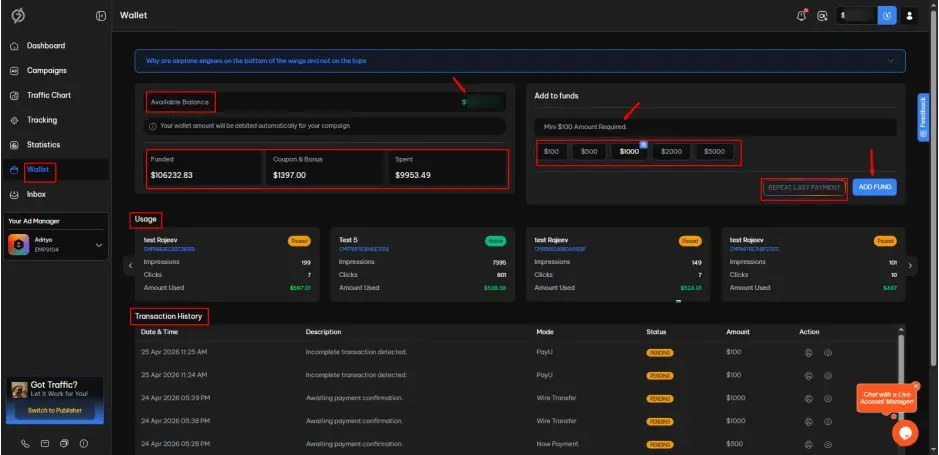
In this section, you can view:
Available Balance
The amount currently available.
Funded
Total funds added to the account to date.
Coupon and Bonus
Total promotional amount received.
Spent
Total amount used.
Just below the Wallet overview section, you will find the “Usage” section. This area provides a clear breakdown of your spending across different campaigns.
On the right side of your dashboard, you will see the "Repeat Last Payment" button. This option allows you to quickly fill in the amount from your previous payment. When you click the button, the amount will be automatically pre-filled for your convenience.
The “Add to Funds” section on the right side of the Wallet Overview allows you to quickly add money to your account. It also shows a recommended amount to help you choose the right value.
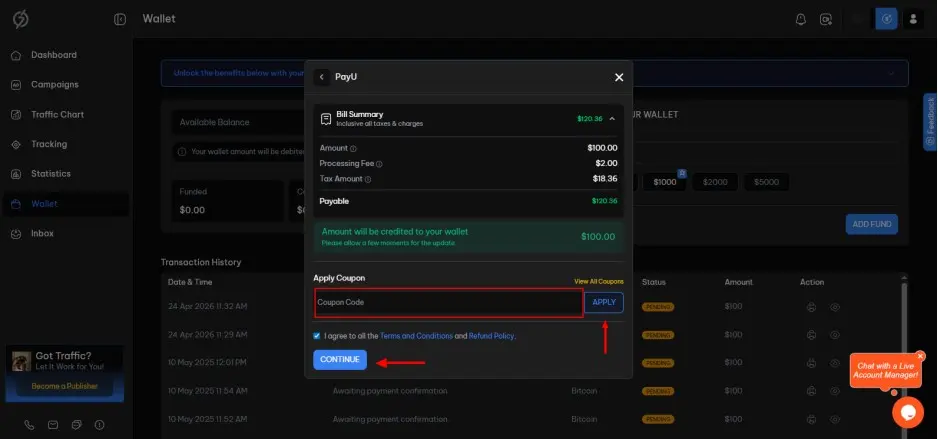
To add funds to your wallet using PayU, please follow the steps below.
Click on the “Wallet” section on the left side of your dashboard.
On the right side of the Wallet page, locate the “Add Funds to Your Wallet” section.
Enter your Tax ID/GST (optional).
Enter the amount you want to add (minimum $100), then click the “Add Fund” button.
Select “PayU” from the available payment methods and click “Continue”.
Below the payable amount, enter your Coupon Code (if any) in the input box and click “Apply”.
Check the box next to “I agree to all the terms and conditions and refund policy.”
Click the “Continue” button.
The PayU checkout page will open. Select your preferred payment option, fill in the required details, and complete the payment.
After completing the payment, you will be redirected to the “Payment Success” page.
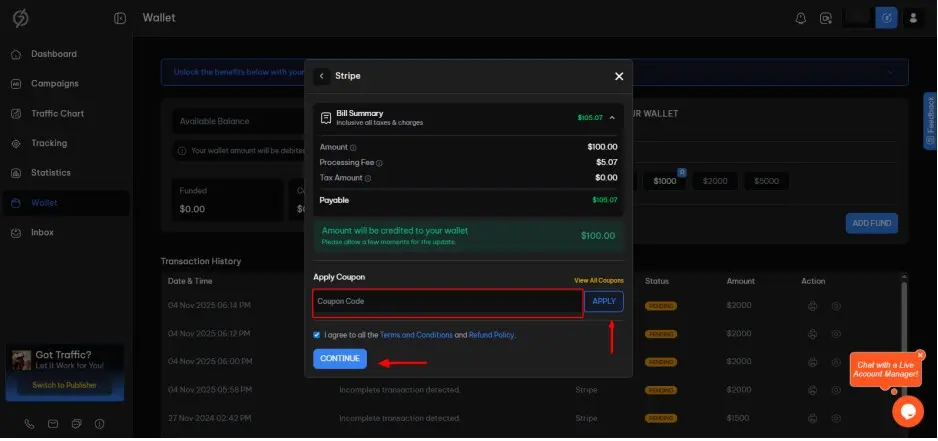
To add funds to your wallet using Stripe, please follow the steps below.
Click on the “Wallet” section on the left side of your dashboard.
On the right side of the Wallet page, locate the “Add Funds to Your Wallet” section.
Enter your Tax ID/GST (optional).
Enter the amount you want to add (minimum $100), then click the “Add Fund” button.
Select “Stripe” from the available payment methods and click “Continue”.
Below the payable amount, enter your Coupon Code (if any) in the input box and click “Apply”.
Check the box next to “I agree to all the terms and conditions and refund policy.”
Click the “Continue” button.
The Stripe checkout page will open. Fill in the required details and click “Pay” to complete the payment.
After completing the payment, you will be redirected to the “Payment Success” page.
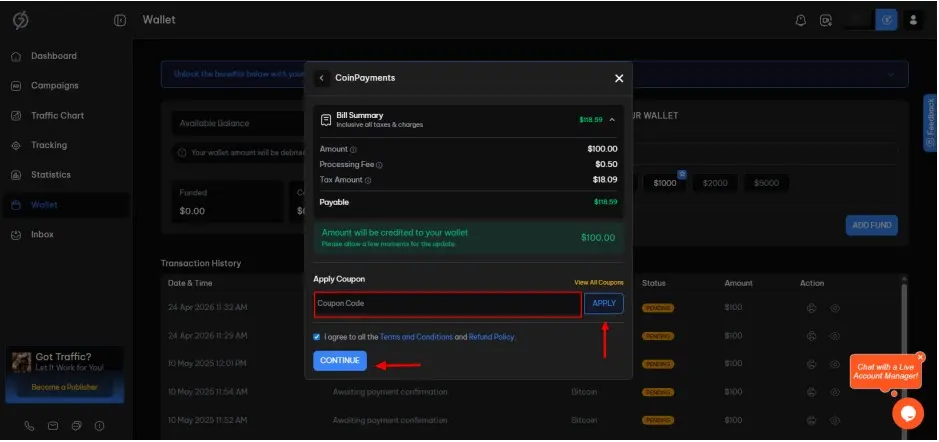
To add funds to your wallet using CoinPayments, please follow the steps below:
Click on the “Wallet” section on the left side of your dashboard.
On the right side of the Wallet page, locate the “Add Funds to Your Wallet” section.
Enter your Tax ID/GST (optional).
Enter the amount you want to add (minimum $100), then click the “Add Fund” button.
Select “CoinPayments” from the available payment methods and click “Continue”.
Below the payable amount, enter your Coupon Code (if any) in the input box and click “Apply”.
Check the box next to “I agree to all the terms and conditions and refund policy.”
Click the “Continue” button.
The CoinPayments checkout page will open. Fill in the required details and click “Complete Checkout”.
Your payment will be processed after approval.

To add funds to your wallet using NOWPayments, please follow the steps below:
Click on the "Wallet" section on the left side of your dashboard.
On the right side of the Wallet Page, locate the "Add Funds to Your Wallet" section.
Enter your Tax ID/GST (optional).
Enter the amount you want to add (minimum $100), then click the "Add Fund" button.
Select "NOWPayments" from the available payment methods and click "Continue".
Below the payable amount, enter your Coupon Code (if any) in the input box and click "Apply".
Check the box next to "I agree to all the terms and conditions and refund policy."
Click the "Continue" button.
The NOWPayments checkout page will open. Choose your preferred asset (e.g., BTC, ETH) and click the "Next Step" button.
Complete the "Send Deposit" step. Your payment will be processed after approval.
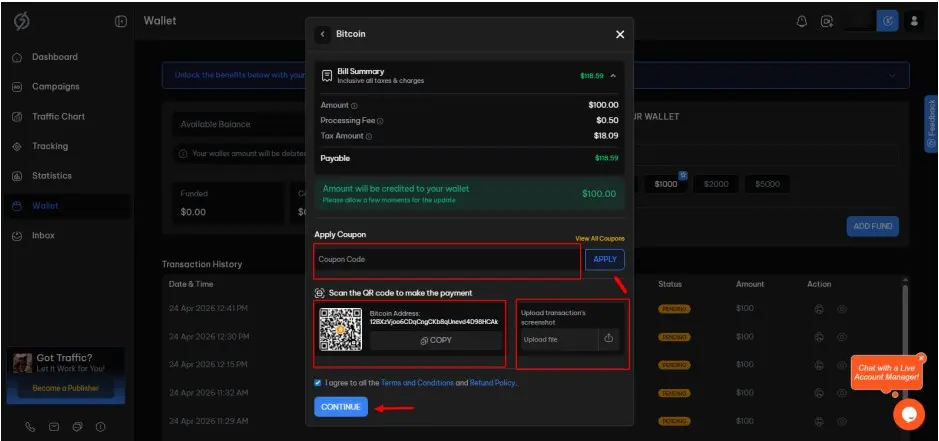
To add funds to your wallet using Bitcoin, please follow the steps below:
Click on the "Wallet" section on the left side of your dashboard.
On the right side of the Wallet Page, locate the "Add Funds to Your Wallet" section.
Enter your Tax ID/GST (optional).
Enter the amount you want to add (minimum $100), then click the "Add Fund" button.
Select "Bitcoin" from the available payment methods and click "Continue".
Below the payable amount, enter your Coupon Code (if any) in the input box and click "Apply".
Complete the payment by scanning the QR code or copying the Bitcoin address .
After making the payment successfully, take a screenshot and upload it.
Check the box next to "I agree to all the terms and conditions and refund policy."
Click "Continue". Your payment will be processed after approval.
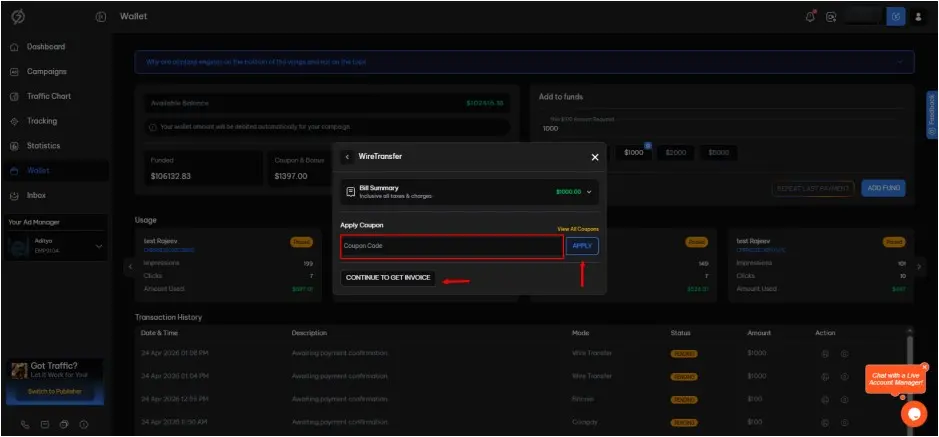
To add funds to your wallet using a Wire Transfer, please follow the steps below:
Click on the "Wallet" section on the left side of your dashboard.
On the right side of the Wallet Page, locate the "Add Funds to Your Wallet" section.
Enter your Tax ID/GST (optional).
Enter the amount you want to add (minimum $1000), then click the "Add Fund" button.
Select "Wire Transfer" from the available payment methods and click "Continue".
Below the payable amount, enter your Coupon Code (if any) in the input box and click "Apply".
Click on the "Continue to Get Invoice" button.
Fill in all the required details and check the box next to "I agree to all the terms and conditions and refund policy."
Click on the "Download Invoice" button.
The invoice will include the banking details required for the payment.
Once you complete the payment, it will be processed after approval.
The Transaction History section provides a detailed record of all wallet activities, including fund additions and refunds (if applicable).
Each transaction entry typically includes the following details:
Date & Time
Description
Mode
Status
Amount
Action (View/Print Invoice)
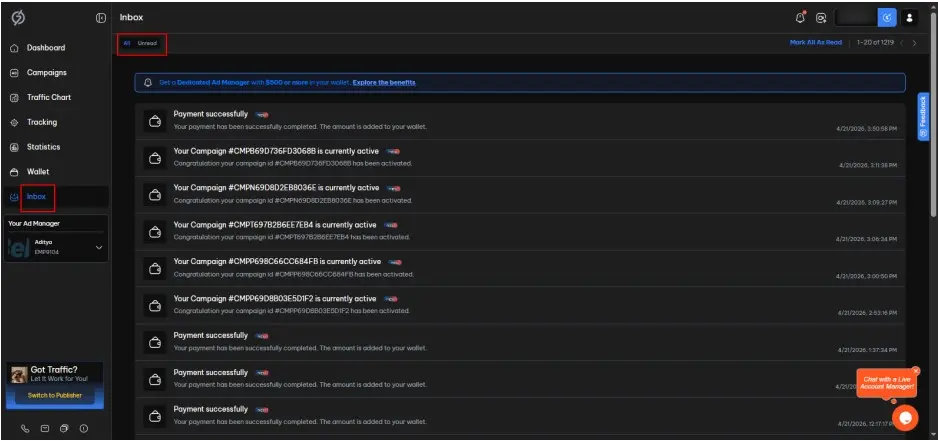
To check notifications for your campaigns, click on the "Inbox" section on the left side of your dashboard. There, you can view all notifications. You can also use the toggle in the top-left corner to switch between "All" and "Unread".
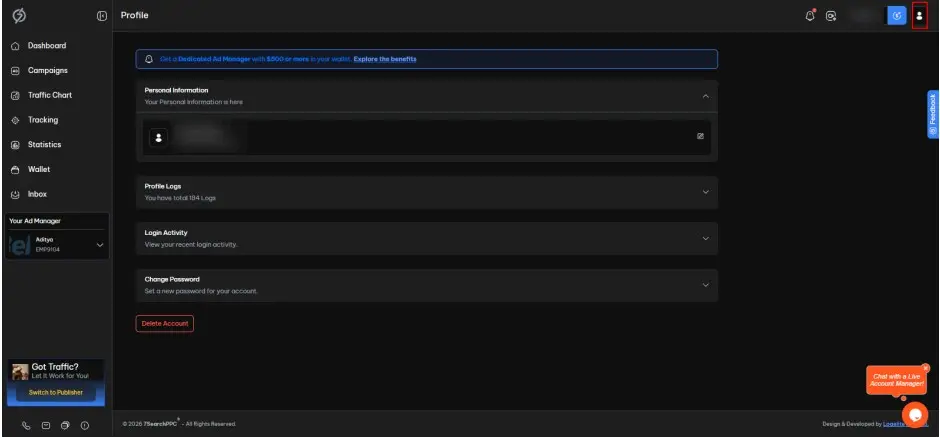
The Profile section has four sub-sections:
Personal Information
Profile Logs
Login Activity
Change Password
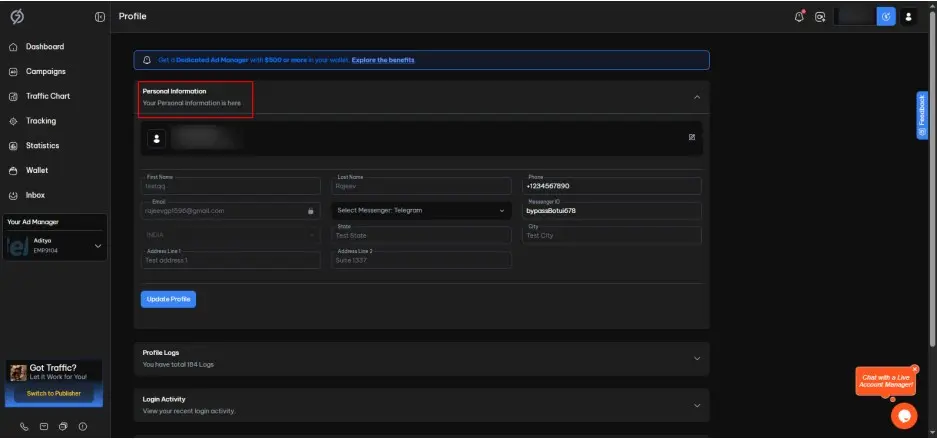
You can view the following information:
First Name
Last Name
Phone
Messenger
Messenger ID
Country Name
State
City
Address Line 1
Address Line 2
Note: Every field can be updated or changed except Email, Country, State, and City.
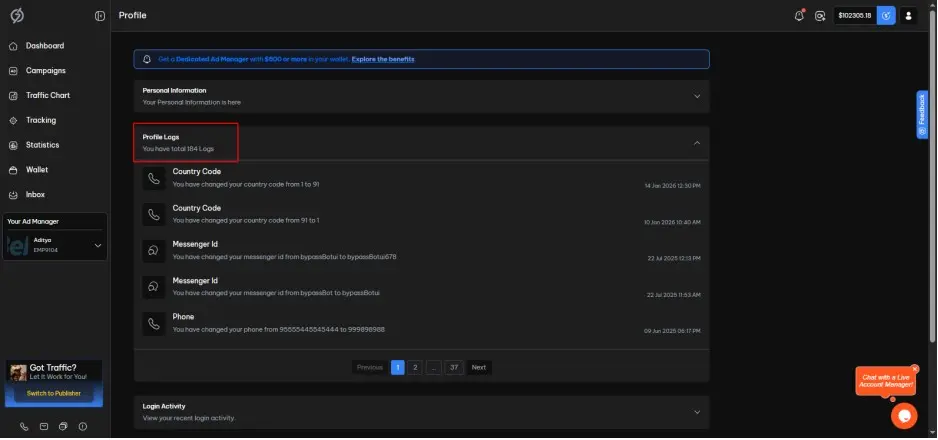
In this section, you can view a record of changes made to your account. This includes updates to your personal information and other profile modifications. It helps you track account activity and maintain transparency regarding any changes.
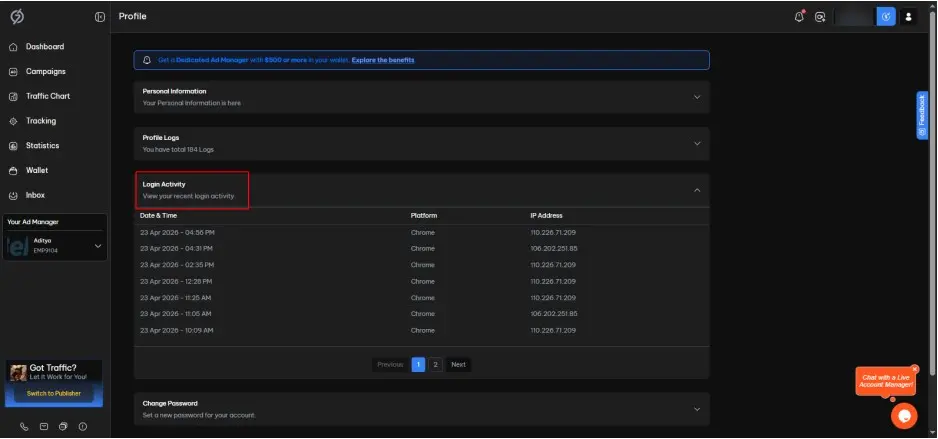
You can click on the Login Activity section to view recent login attempts, including the date, time, browser, and IP address. This section helps you monitor account access and quickly identify any unauthorized login attempts.
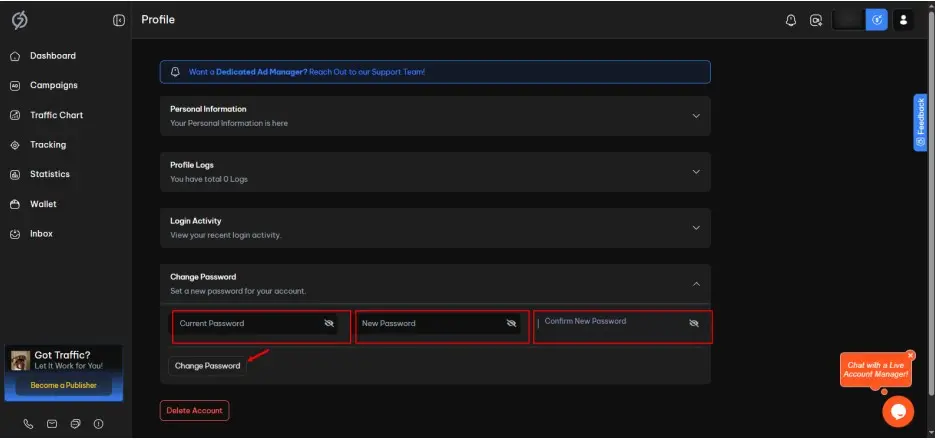
The Change Password option lets you update your account password for security. To change your password, follow the steps below:
Click on the “Change Password” section.
Enter your Current Password.
Enter your New Password, then confirm it by entering it again.
Review the new password and click on “Change Password”.
For better account protection, use a strong and unique password and update it periodically.
You can permanently delete your account by following these steps:
Click "Delete Account":
A confirmation pop-up will appear.
Confirm Deletion:
Choose "Yes" to proceed or "No" to cancel the deletion process.
Submit Reason for Deletion:
If you select "Yes", you will be prompted to provide a reason for your deletion request.
Review by Our Team:
Once you submit the request, our team will review it and take the appropriate actions accordingly.
If you need assistance, you can easily reach our support team from your dashboard. On the bottom-left side, you will find four options: Phone, Email, Ticket, and User Guide. Simply choose the option that works best for you to get help quickly.
Go to 7searchppc.com
Click on the “Register” and Select “Publisher”
Proceed with the “Continue” button
A registration form will appear, which you need to fill out to complete your registration.

First Name
Enter your first name
Last Name
Enter your last name
Email Address
Provide a valid email ID
Country Code
Select your country code
Phone Number
Provide a valid phone number
Messaging Platform
Select a messaging platform from the list
Whats App
Telegram
Skype
None
Username/Number
Enter your messaging platform user name or number
Password
Create a strong password
Checkbox 1
Check this box to give consent to the platform's Terms and Privacy Policy
Checkbox 2
Check this box to give consent to receive promotional messages and other alerts
Click “Create an Account” to submit your details and verify your email.
An OTP Verification Popup
Open your inbox, find an email from 7SearchPPC
Copy the 6-digit OTP
Enter the OTP in the OTP verification pop-up
Click “Verify” to successfully register your account. Once done, you will be redirected to your 7SearchPPC Advertiser Panel after a count of 10.
Go to 7searchppc.com
Click on the “Log in” button – the sign in page will open
Select Account Type (As a publisher)
Once selected, a login page will open
On the sign-in page, fill in the required credentials (Email ID and Password)
Click the “Login” button.
Once clicked, you will be redirected to your publisher dashboard.
Click on the “Forgot Password?” option available on the “Login Page” (In case you have forgotten your password)
The reset password page will open
Enter your registered email id
Click on “Send Reset Link” button
Once the processing will complete, you will see the following message
Password reset link sent!
Go to your email account
Look for an email from 7SearchPPC with the subject line “Reset Your Password - 7SearchPPC”
Click on the “RESET NOW” button
Password reset page will open
Enter a new password
Create a strong password
Use at least 8 characters
Use a combination of alphabet, symbols, and numbers
Use at least One Upper Case Character
Use at least One Special Character
Use at least One Digit
Enter the password again for confirmation
Click on the Update Password” button
You will get the following message
Password Reset Successfully!
Click on “Return to Login” link to go to the login page
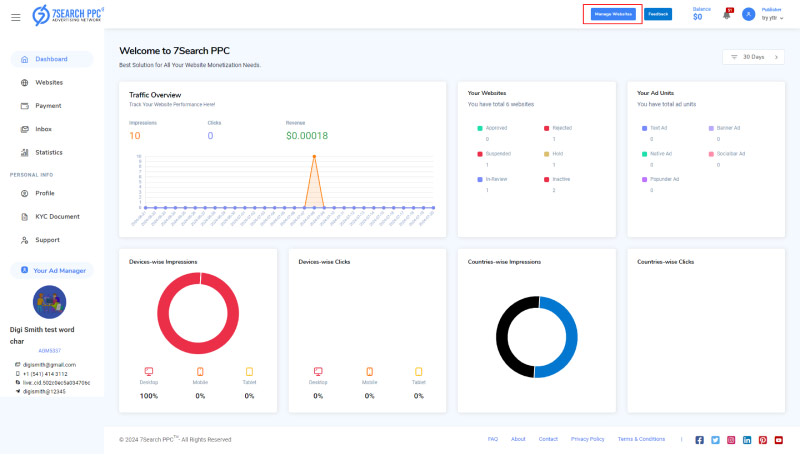
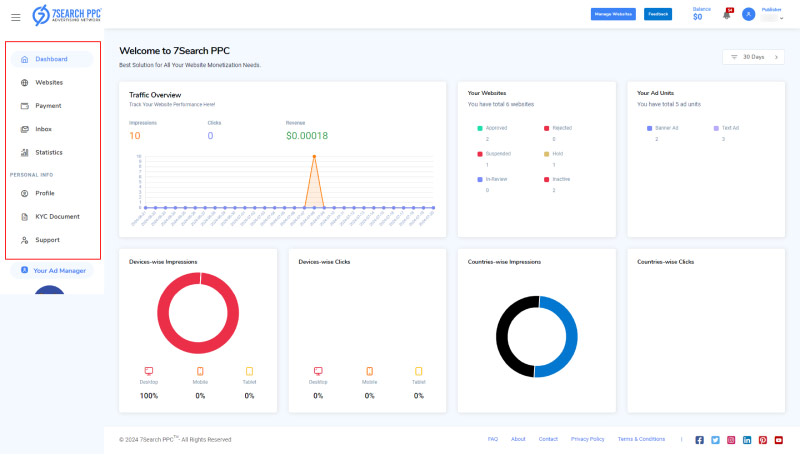
Once you log into your 7SearchPPC publisher account, a comprehensive Dashboard will appear along with a Top Bar and Sidebar Navigation.
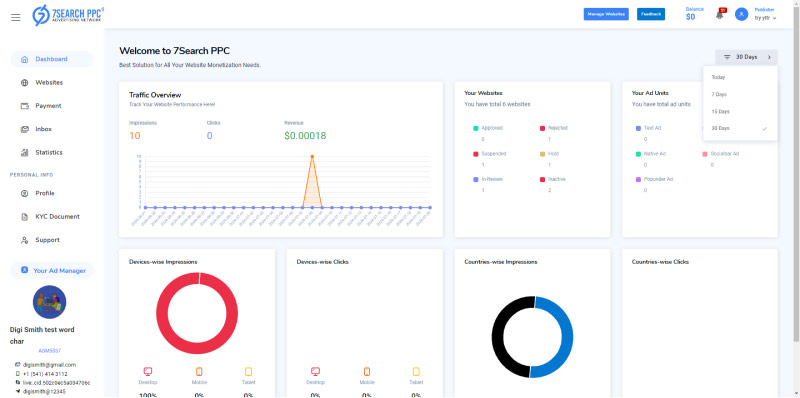
You will find the following data on the “Dashboard”
Filter
Traffic Overview
Your Websites
Your Ad Units
Device-wise Impressions
Device-wise Clicks
Country-wise Impressions
Country-wise Clicks
It will help you filter the data shown on the dashboard
By default, it will only show the data for the current day
You can choose to see the data of
Last Today
Last 7 Days
Last 15 Days
Last 30 Days
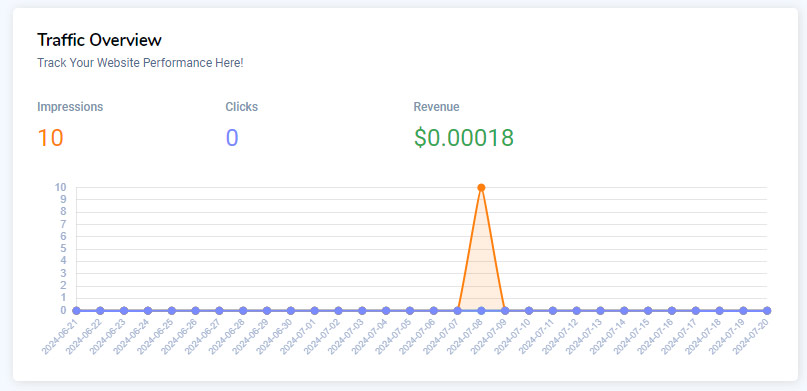
This graph will show you the following:
Clicks
Total number of clicks on all your ads
Impressions
Total number of impressions on all your ads
Revenue
Total earnings on all your ads
The filter will determine the duration of the data.
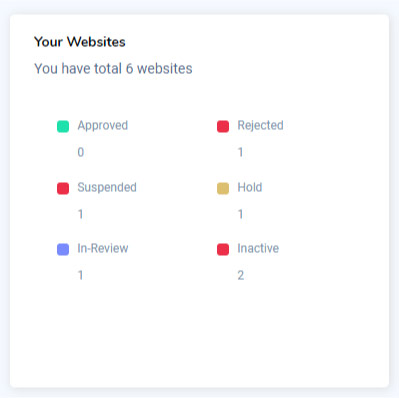
This section will show information regarding your added websites.
You can track the following information in this section:
Total added websites
Total Approved websites
Total rejected websites
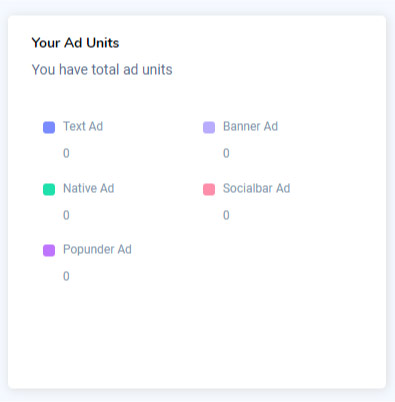
You can use this section to see all your ad units and their related information, like
Total ad units for Text Ads
Total ad units for Banner Ads
Total ad units for Native Ads
Total ad units for Popunder Ads
Total ad units for In-Page Push Ads
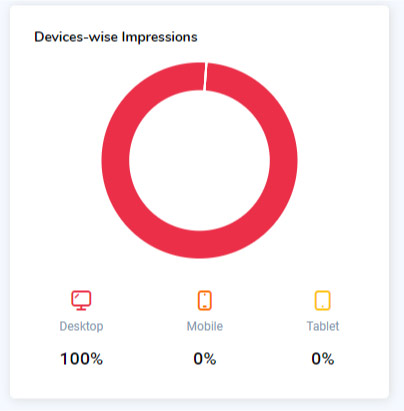
You can track your device-wise impressions using this section.
Here, you get a quick overview of your:
Total impressions from desktops
Total impressions from mobile phones
Total impressions from tablets
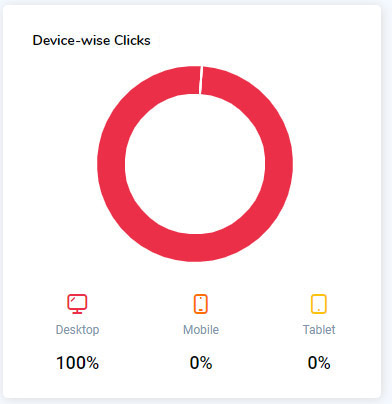
You can track your device-wise clicks using this section.
Here, you get a quick overview of your:
Total clicks from desktops
Total clicks from mobile phones
Total clicks from tablets
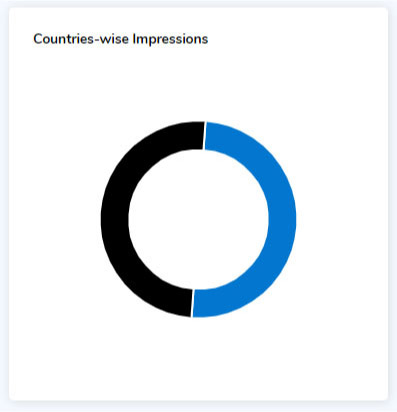
You can use this section to track country-wise impressions.
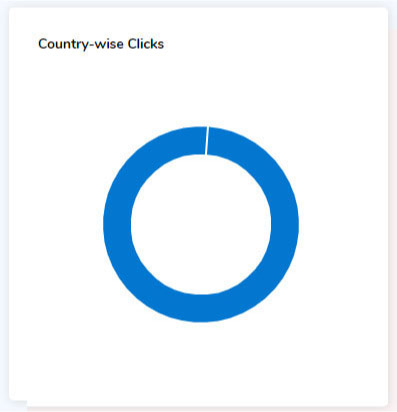
You can use this section to track country-wise clicks.
In the top-left corner of the screen, you will find a three-line menu icon
You can click on this menu icon to expand or collapse the Sidebar Navigation
Next to the menu icon, you will find a logo of 7SearchPPC
You can click this logo to go to the home page
A “Manage Websites” button is available in the middle of the Top Bar.
You can click this button to add new websites or to preview your registered websites.
After the search bar, you get a filter option to find out your total added websites based on their status.
All
Filter all websites
In Review
Filter websites in review
Active
Filter active websites
Hold
Filter websites on hold
Suspended
Filter suspended websites
Rejected
Filter rejected websites
Right after the filter bar, you get an “Add Website” button to add new websites.
When you click the “Add Website” button, a new interface will appear with a “Ad New Website” form. To add a new website, you will need to fill in the following details.
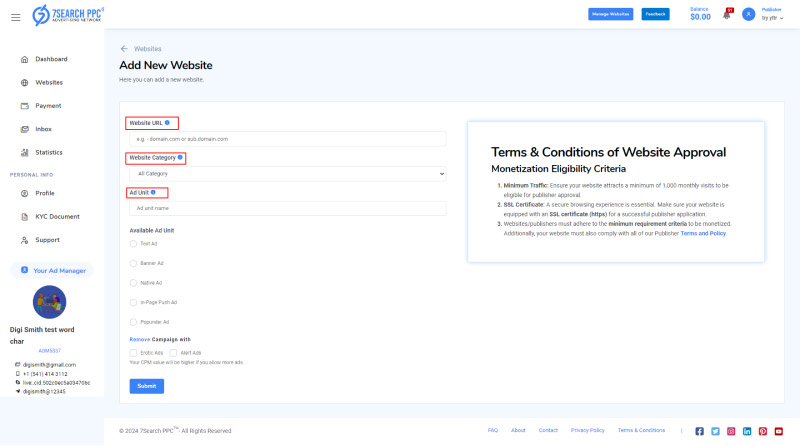
Website URL
Provide your website link
Our system will automatically reject websites without SSL certificates.
Website Category
Choose the website category (Traffic category)
Ad Unit
Generate Ad unit
Available Ad Unit
Choose ad format
You will also be required to select a “Grid Type” if you choose “Native Ad.”
Remove Campaign with
Mark check “Erotic Ads” if you do not want to run erotic ads.
This option will remain hidden if you have chosen the "Adult" category for your website.
Mark check “Erotic Ads” or “Alert Ads” if you do not want to run these ads
Once done, click the “Submit” button to submit your website details.
Once submitted the Website details, a pop-up will appear with a “Meta Tag Code.”
Click “Copy” to copy the code and verify your website ownership.
Verify WordPress Website Ownership
Copy the Code, open your WordPress Admin in another tab, click appearance, choose the Theme file editor, and paste the Code in the head. Now, go back to 7SearchPPC, where you left earlier, and click the verify button.
Verify Blogger Ownership
Copy the Code, open Blogger in another tab, visit the theme, click Edit HTML, and paste the Code under the head section. Now, again, go back to 7SearchPPC, where you left earlier, and click the verify button. That's it.
Verify HTML Website Ownership
Copy the Code, open your HTML website Admin in another tab, open the website code, and paste the copied script under the head section. Now, go back to the 7SearchPPC tab and click the verify button; that's it.
If all details are correct, your website will be verified instantly, and you will receive a verification email.
Your website will then be under moderation until our team reviews and approves it.
Upon approval, you will receive a confirmation email with the subject “Website Added Successfully” at your registered email address.
Click the “Back to List” button to return to the “Websites” page.
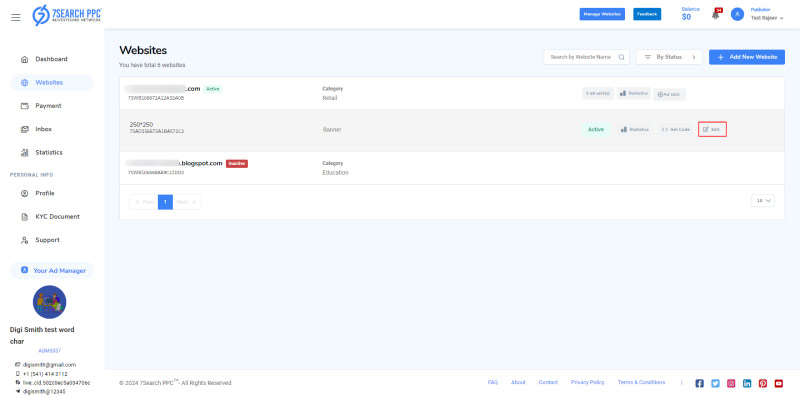
You will also see a comprehensive list of your added websites.
Each website contains details like;
After the category information, you will find three unique options:
The ad units you have generated for a specific website will become visible directly below the website information when you select the "Ad unit" button.
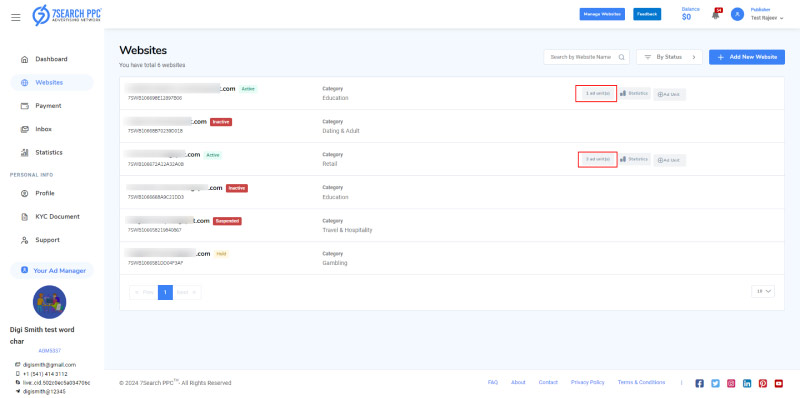
Every ad unit displays four different options:
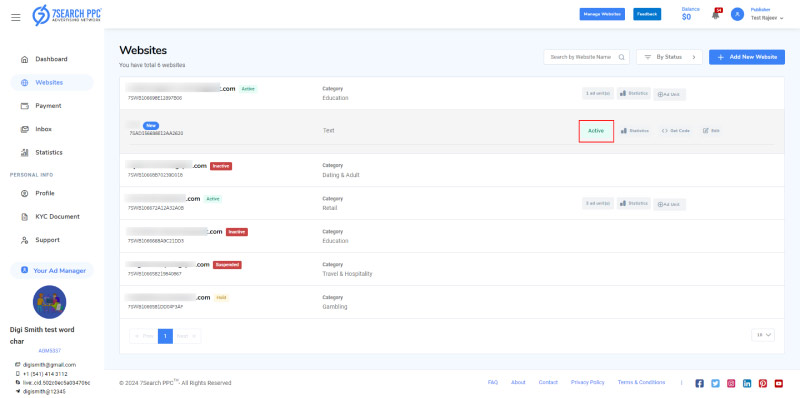
Indicates whether the ad unit is active or not.
This key will help you explore statistics associated with a particular ad unit.
Once you click the “Statistics” button,
You will be redirected to a Statistics page.
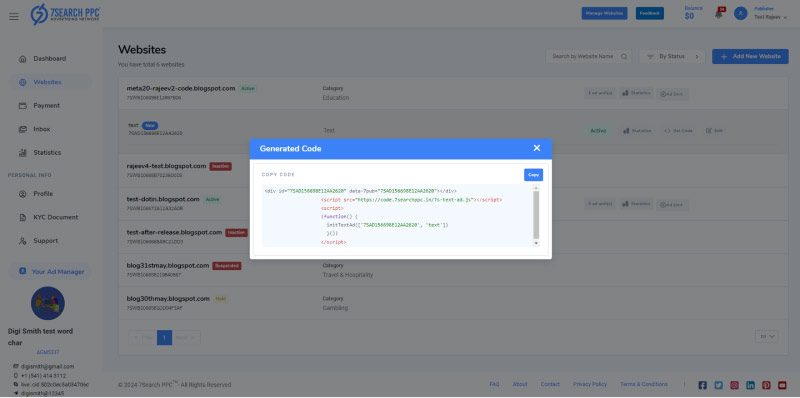
You can click this button to see and copy your ad script.
4.5.3.1. Add Ad Script to Blogger Website
Follow these steps to paste the ad script to your blogger Website;
Open and copy your ad script by clicking the “Get Code” button
Open your Blogger Admin dashboard
Click the Layout button available in the navigation bar

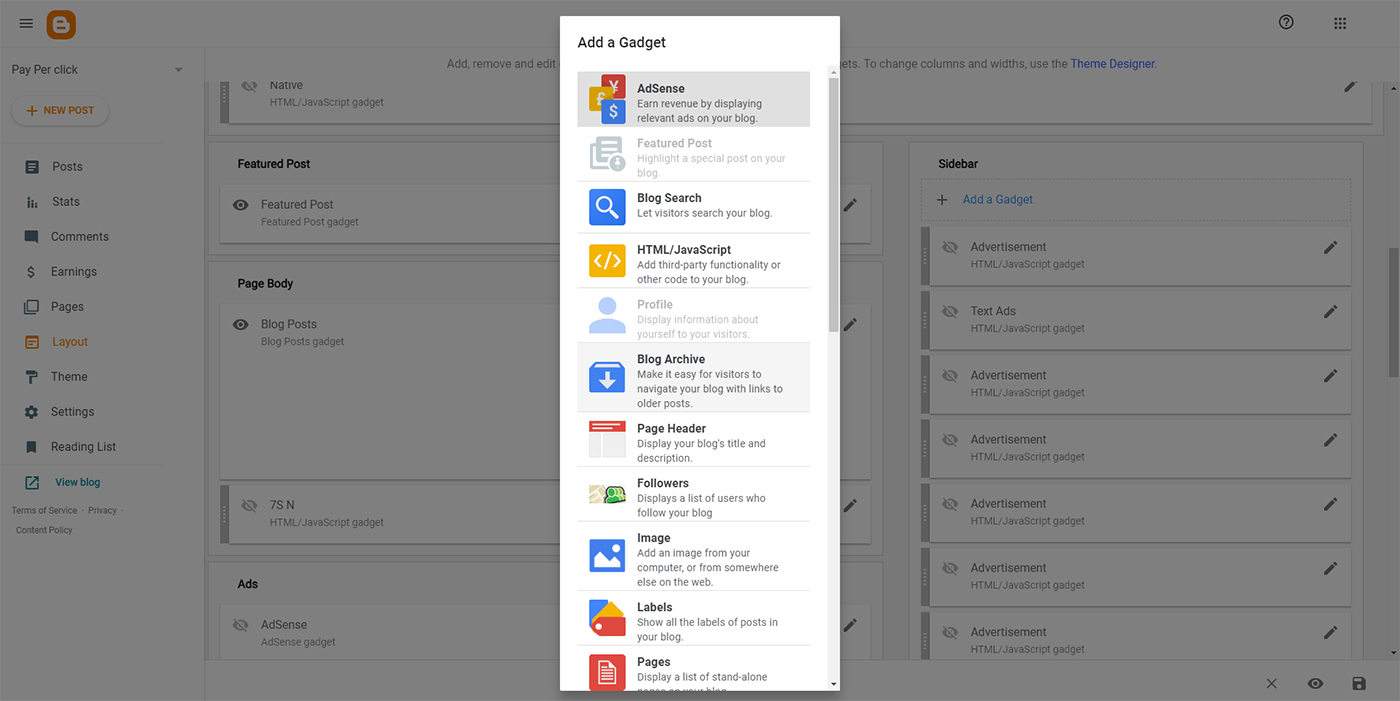
Click the “Add a Gadget” button in a suitable area of your website
Select “HTML/JavaScript” in the pop-up
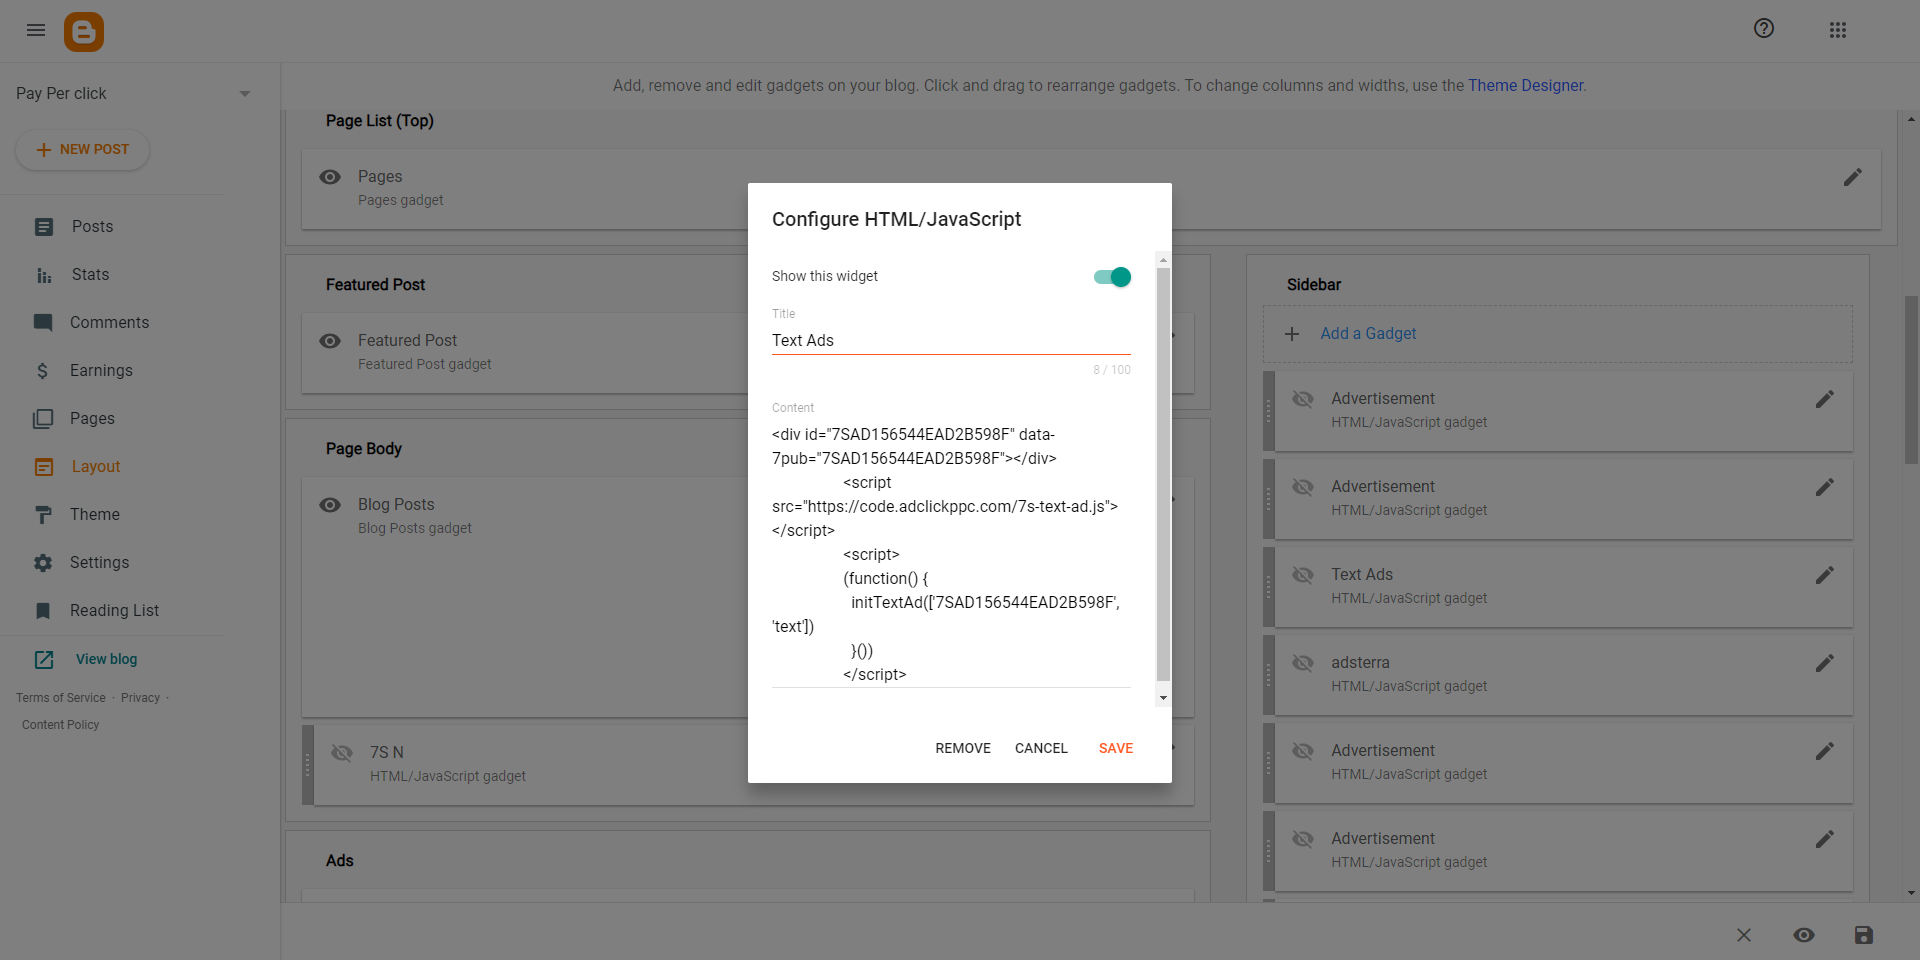
Paste the ad script in the “Content” field.
That’s it. Your ad script has been pasted successfully!
4.5.3.2. Add Ad Script to WordPress Website
Follow these steps to paste the ad script to your WordPress Website;
Open and copy your ad script by clicking the “Get Code” button
Open your WordPress Admin dashboard
Click the “Appearance” button available in the navigation bar
Select “Widgets” and paste your ad script in the suitable area
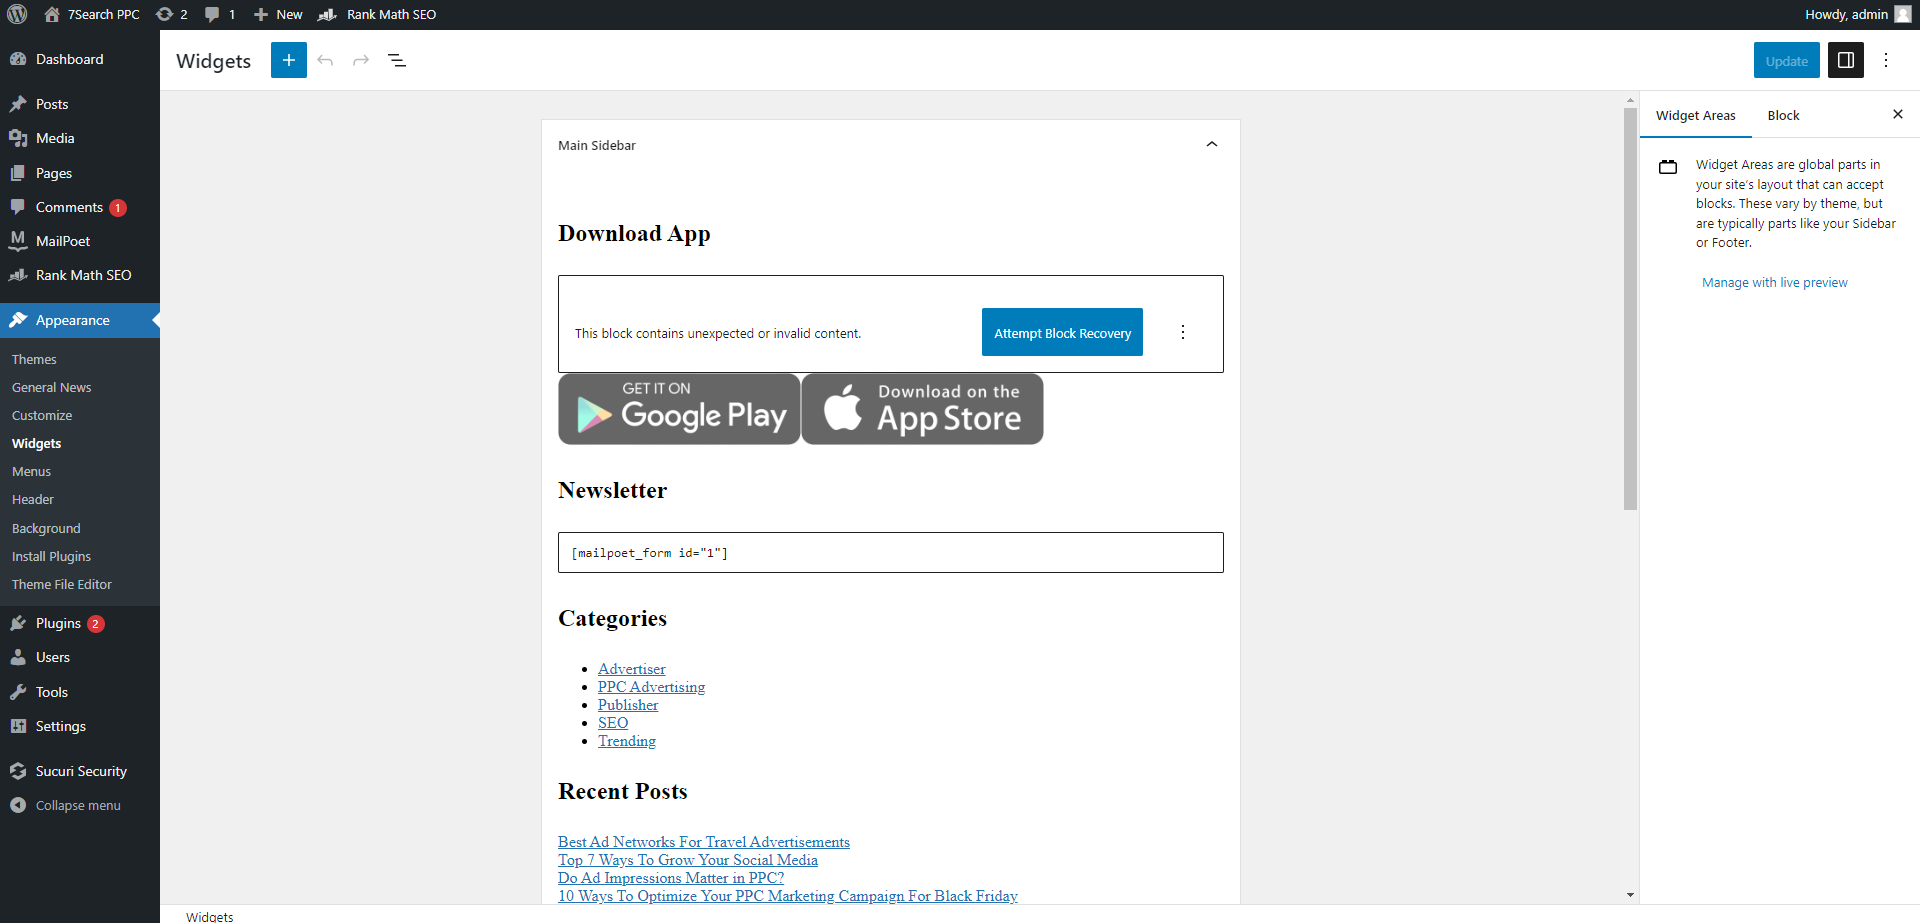
That’s it. Your ad script has been pasted successfully!
4.5.3.3. Add Ad Script to HTML (Custom-made) Website
Follow these steps to paste the ad script to your HTML (Custom-made) Website;
Open and copy your ad script by clicking the “Get Code” button
Open the website code
Select a suitable website area for the ad
Paste the ad script.
That’s it. Your ad script has been pasted successfully!
Click the “Edit” button to edit your ad unit name.
Right after the ad unit (s), you get a “Statistics” button.

You can click the “Statistics” key to explore data associated with a particular website.
Once you click the “Statistics” button,
You will be redirected to a Statistics page.
Next to the statistics section, you will find a “+ Add Unit” button that you can click to create a new ad unit for a particular website.
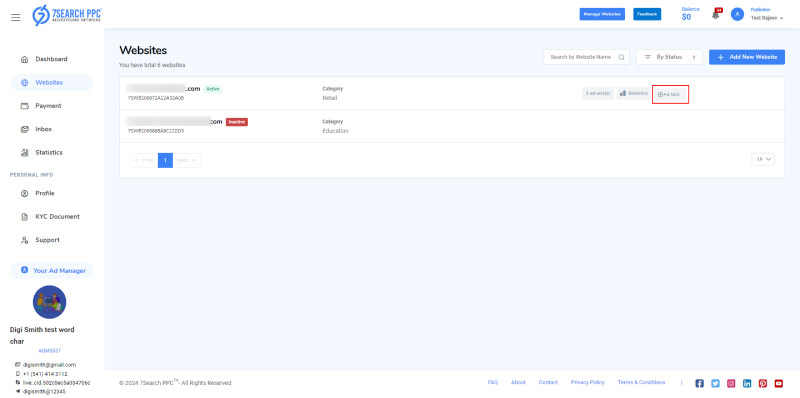
When you click the “+ Ad Unit” button, you will be redirected to the “Create Ad Unit” page.
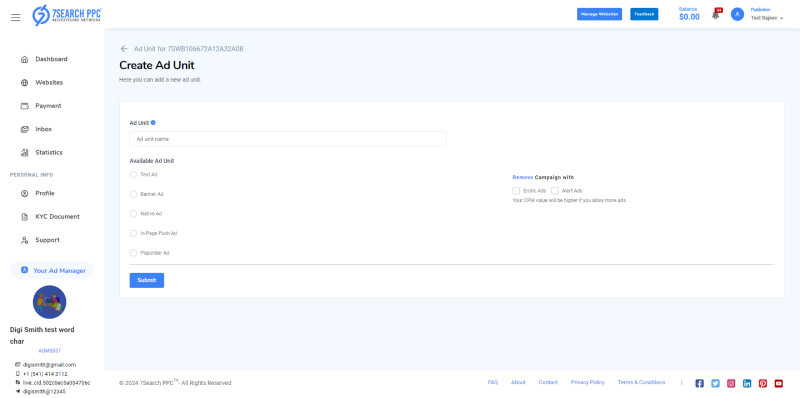
Put in the following details to create a new ad unit.
Ad Unit
Provide a title/name for your ad unit.
The name will be changeable, and you can edit it anytime using the edit button.
Available Ad Unit
Choose your desired ad format from the list of available Ad Units.
You must also select a“Grid Type” if you choose “Native Ad.”
The ad format will not be changed once the ad unit is created.
Remove Campaign with
Mark check “Erotic Ads” if you do not want to run erotic ads.
This option will remain hidden if you have chosen the "Adult" category for your website.
Mark check “Alert Ads” if you do not want to run alert ads.
Once done, click the “Submit” button to submit your ad unit details.
Now, a congratulatory message will appear with the button “Back to List.” You can click this button to return to the “Websites” page.

You will also receive a confirmation email with the subject “Ad Unit Created.”
It allows you to share your experience, queries, and feedback.
Next to the Manage Website button is a “Balance” button that you can click to check your earnings .
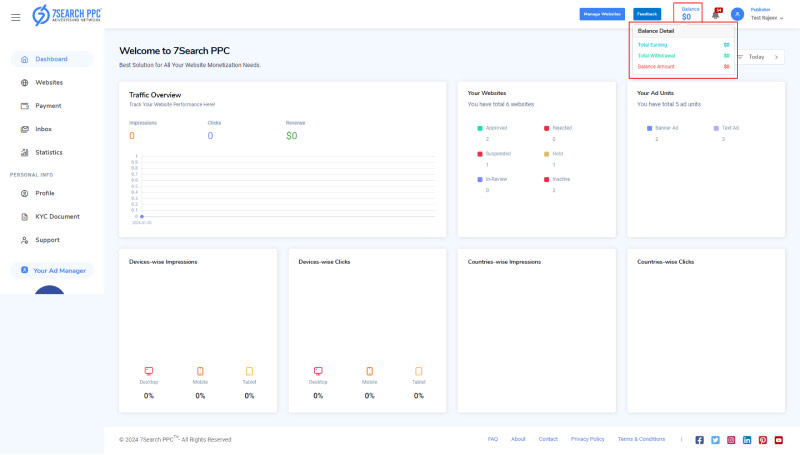
Total Earning
Contains details of your total earnings
Total Withdrawal
Contains details of total earnings you have withdrawn
Balance Amount
Contains details of total earnings on hold
The next option will be a notification icon
You can click on it to see a list of recent notifications
You can click on the “View All” option to see all the notifications in the “Inbox” section
The last option will be the profile icon
Next to the profile icon, you will see the account type, Publisher
Under the Publisher, your name will be displayed
When you click on the profile icon, you will see a menu with the following options;
Your Name
View Profile
This option will take you to your profile section
Account Setting
This option will take you to the “Change Password” section
Login Activity
This option will take you to the “Account Activity” section
Sign Out
You can log out from 7SearchPPC using this option
You will find various sections listed in the sidebar menu
If you are on a small-screen device, this section might not be visible. Please click on the three-line menu icon in the top-left corner if you are unable to see the sidebar navigation
The sidebar menu will have the following options
Websites
Inbox
Statistics
Profile
KYC Document
Support
Your Ad Manager
Become Advertiser/Switch to Advertiser
A “Websites” button is available in the middle of the Sidebar.
You can click this button to add new websites or to preview your registered websites.
After the search bar, you get a filter option to find out your total added websites based on their status.
All
Filter all websites
In Review
Filter websites in review
Active
Filter active websites
Hold
Filter websites on hold
Suspended
Filter suspended websites
Rejected
Filter rejected websites
Right after the filter bar, you get an “Add Website” button to add new websites.
When you click the “Add Website” button, a new interface will appear with a “Ad New Website” form. To add a new website, you will need to fill in the following details.
Website URL
Provide your website link
Our system will automatically reject websites without SSL certificates.
Website Category
Choose the website category (Traffic category)
Ad Unit
Generate Ad unit
Available Ad Unit
Choose ad format
You will also be required to select a “Grid Type” if you choose “Native Ad.”
Remove Campaign with
Mark check “Erotic Ads” if you do not want to run erotic ads.
This option will remain hidden if you have chosen the "Adult" category for your website.
Mark check “Erotic Ads” or “Alert Ads” if you do not want to run these ads
Once done, click the “Submit” button to submit your website details.
Once submitted the Website details, a pop-up will appear with a “Meta Tag Code.”
Click “Copy” to copy the code and verify your website ownership.
Verify WordPress Website Ownership
Copy the Code, open your WordPress Admin in another tab, click appearance, choose the Theme file editor, and paste the Code in the head. Now, go back to 7SearchPPC, where you left earlier, and click the verify button.
Verify Blogger Ownership
Copy the Code, open Blogger in another tab, visit the theme, click Edit HTML, and paste the Code under the head section. Now, again, go back to 7SearchPPC, where you left earlier, and click the verify button. That's it.
Verify HTML Website Ownership
Copy the Code, open your HTML website Admin in another tab, open the website code, and paste the copied script under the head section. Now, go back to the 7SearchPPC tab and click the verify button; that's it.
If all details are correct, your website will be verified instantly, and you will receive a verification email.
Your website will then be under moderation until our team reviews and approves it.
Upon approval, you will receive a confirmation email with the subject “Website Added Successfully” at your registered email address.
Click the “Back to List” button to return to the “Websites” page.
You will also see a comprehensive list of your added websites.
Each website contains details like;
After the category information, you will find three unique options:
The ad units you have generated for a specific website will become visible directly below the website information when you select the "Ad unit" button.
Every ad unit displays four different options:
Indicates whether the ad unit is active or not.
This key will help you explore statistics associated with a particular ad unit.
Once you click the “Statistics” button,
You will be redirected to a Statistics page.
You can click this button to see and copy your ad script.
6.3.3.1. Add Ad Script to Blogger Website
Follow these steps to paste the ad script to your blogger Website;
Open and copy your ad script by clicking the “Get Code” button
Open your Blogger Admin dashboard
Click the Layout button available in the navigation bar
Click the “Add a Gadget” button in a suitable area of your website
Select “HTML/JavaScript” in the pop-up
Paste the ad script in the “Content” field.
That’s it. Your ad script has been pasted successfully!
6.3.3.2. Add Ad Script to WordPress Website
Follow these steps to paste the ad script to your WordPress Website;
Open and copy your ad script by clicking the “Get Code” button
Open your WordPress Admin dashboard
Click the “Appearance” button available in the navigation bar
Select “Widgets” and paste your ad script in the suitable area
That’s it. Your ad script has been pasted successfully!
6.3.3.3. Add Ad Script to HTML (Custom-made) Website
Follow these steps to paste the ad script to your HTML (Custom-made) Website;
Open and copy your ad script by clicking the “Get Code” button
Open the website code
Select a suitable website area for the ad
Paste the ad script.
That’s it. Your ad script has been pasted successfully!
Click the “Edit” button to edit your ad unit name.
Right after the ad unit (s), you get a “Statistics” button.
You can click the “Statistics” key to explore data associated with a particular website.
Once you click the “Statistics” button,
You will be redirected to a Statistics page.
Next to the statistics section, you will find a “+ Add Unit” button that you can click to create a new ad unit for a particular website.
When you click the “+ Ad Unit” button, you will be redirected to the “Create Ad Unit” page.
Put in the following details to create a new ad unit.
Ad Unit
Provide a title/name for your ad unit.
The name will be changeable, and you can edit it anytime using the edit button.
Available Ad Unit
Choose your desired ad format from the list of available Ad Units.
You must also select a“Grid Type” if you choose “Native Ad.”
The ad format will not be changed once the ad unit is created.
Remove Campaign with
Mark check “Erotic Ads” if you do not want to run erotic ads.
This option will remain hidden if you have chosen the "Adult" category for your website.
Mark check “Alert Ads” if you do not want to run alert ads.
Once done, click the “Submit” button to submit your ad unit details.
Now, a congratulatory message will appear with the button “Back to List.” You can click this button to return to the “Websites” page.
You will also receive a confirmation email with the subject “Ad Unit Created.”
You can visit the inbox module to check and read all the recent notifications or alerts.
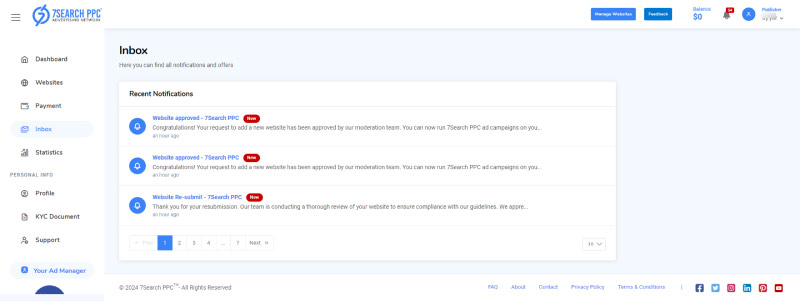
You will find a list of your recent notifications in this section with the following details:
Notification Title
Summary
You can click on a notification to view more details
You can also find any link attached to the notification in this section
The link will open in a new tab when clicked
Your “Recent Notifications” section may remain blank if you do not have any notifications in your inbox.
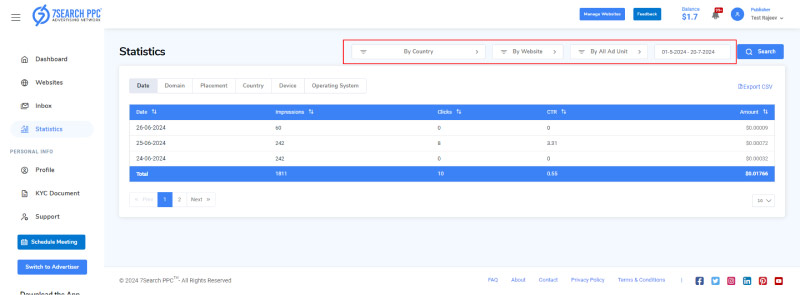
You can explore all the data related to your publisher account using the “Statistics” section.
Here, you can generate and filter your stats using the following setups:
Report By Country
Explore country-wise reports
Report by Website
Explore website-wise reports
By All Ads Unit
Filter Data by Ads
Date Range
Filter data by date range
Search
Click the “Search” button after selecting report types and filters
Once clicked, the data based on your selected report types and/or filters will appear.
Here, you have six additional filters to access your data:
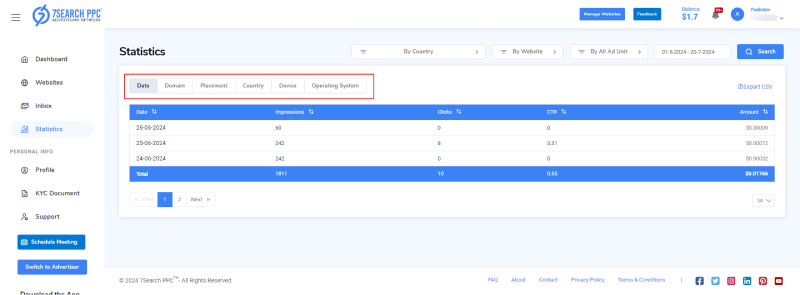
Date
Track records for the last seven days
Domain
Track the traffic records of all your registered websites
Placement
Track traffic records based on all ad placements
Country
Track traffic records based on all selected countries
Device
Track traffic records based on all device types
Operating System
Track traffic records based on all operating systems
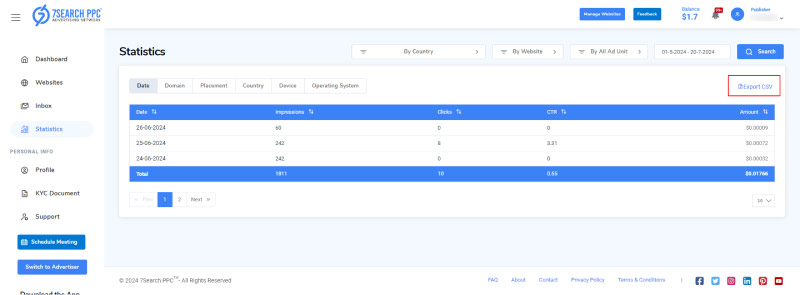
You can also click “Export CSV” to download the report.
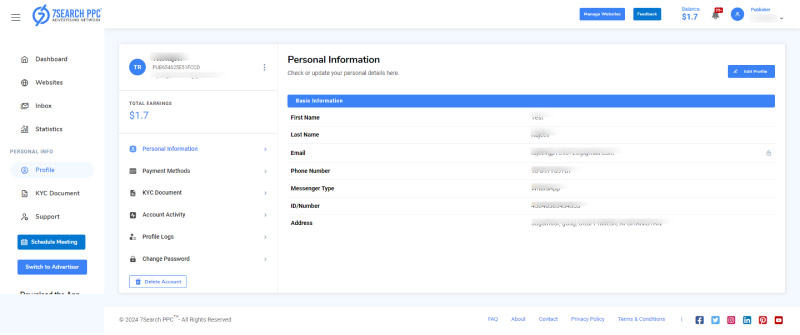
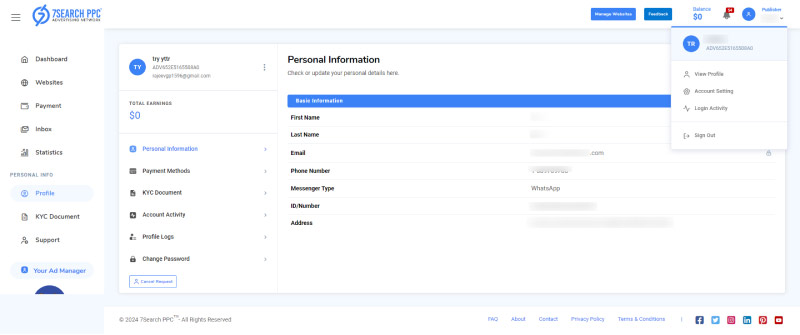
The profile section has five sub-sections:
Personal information
Payments Methods
KYC Document
Account Activity
Profile Logs
Change Password
You can view the following information:
First Name
Last Name
Messenger Type
ID/Number
Address
Edit Profile
In the top right of the “Personal Information” section, you will find the “Edit Profile” button
You can edit all the information except for email
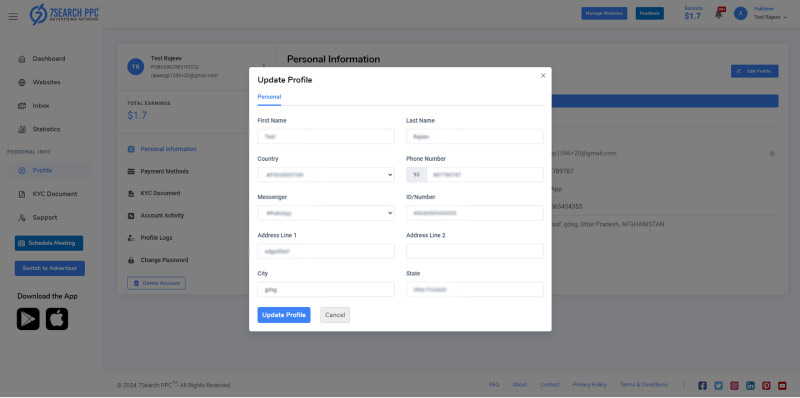
Click on the “Edit profile” button, and a pop-up will open
Fill in the information that you want to change
Click on the “Update Profile button to save changes
You will get a “Profile Updated Successfully” message, and the changes will be saved.
You will receive an email with the subject “Profile Updated” every time you make changes to your profile information.

You can view and change your payment methods using this section.
A threshold amount (minimum amount) will be automatically set when you select a particular payment method.
Specific platform fees will also apply to each payment method.
The minimum payment amount and platform fee can vary depending on the selected payment method.
Account ID
After choosing a payment method, you can provide the associated account ID in the next section.
Withdrawal Limit
You can set your minimum withdrawal (threshold) amount here.
Make sure you do not set less than the minimum payout amount.
You will receive an email with the subject “Threshold Amount Set” every time you change your minimum withdrawal limit.
Update Payment Method
You can click the “Update Payment Method” to finish and lock the setup.
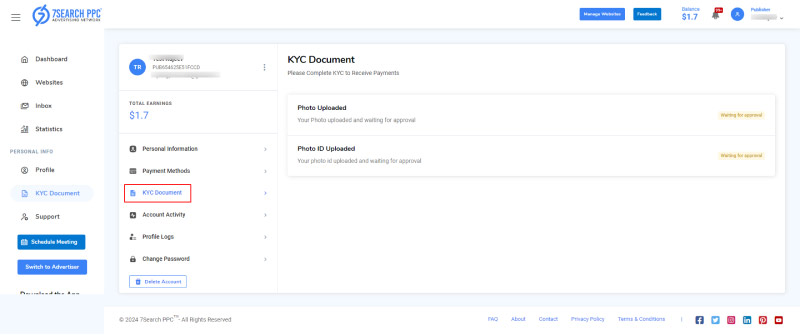
Use the “KYC Document” section to complete your KYC.
Upload Photo
Click the “Upload Photo” button to upload a passport-size photo.
Upload Photo ID
Click the “Upload Photo ID” button to upload a copy of your government-issued ID card.
Submit KYC Details
Click the “Submit KYC Detail” button to submit your details for further verification.
You will receive a mail with the subject “KYC Update Request Received” once you submit the details.
We may take 3 to 5 business days to check and approve your KYC documents.
If there are any discrepancies in your uploaded documents, your KYC might be rejected.
You will receive an email with the subject "KYC Rejection Notice" if your KYC is rejected.
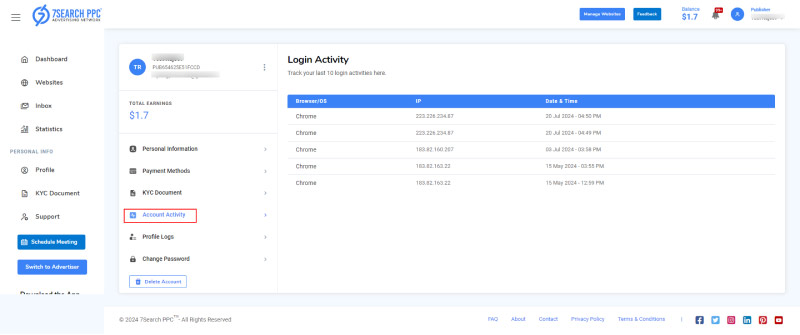
The “Account Activity” section allows you to access your last ten login details.
Details include
Browser
IP
Date & Time
Profile Logs will help you track any changes you make to your account. This will show you the following details;
Date/Time
User Type
Previous
Updated
Description
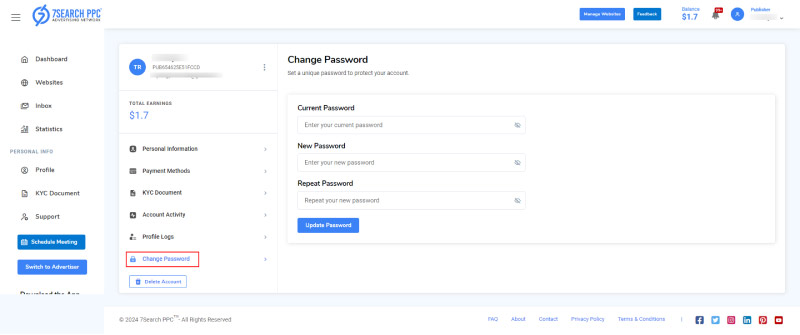
Follow the below-mentioned steps to update your password:
Enter your current password
Enter the new password
Create a strong password
Use at least 4 characters
Confirm the new password
Click on the Update Password button
You will get a message Password Updated Successfully
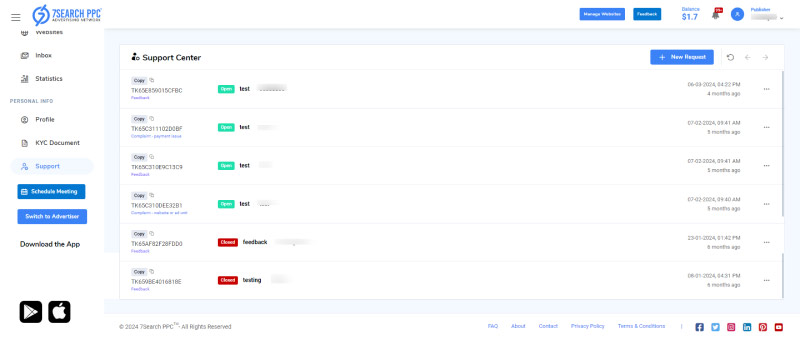
The support section allows you to raise complaints or query tickets and track responses from the admin.
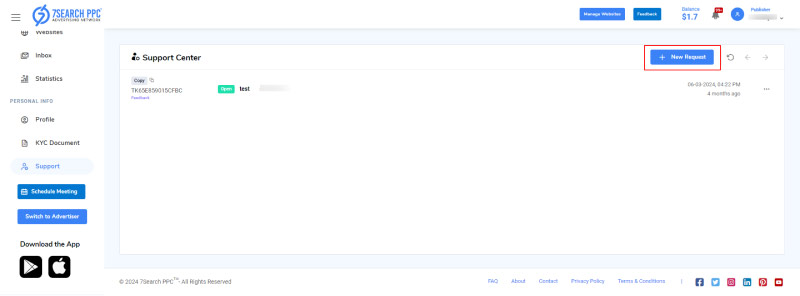
To raise a new support ticket
Click on the “New Request” button
A form will appear
Select the type of ticket
Complaint
Feedback
If you select complaint, a new selector will appear with following options
Payment Issue
Website or Ad Unit
Other
Enter the subject for your ticket
Enter your message (Provide a detailed description of your problem)
Add attachment
You can attach JPG/JPEG, PNG, and PDF file
Click on the Send” button to submit your ticket
This section will show the list of all the tickets you have created with the following information:
Ticket ID
This column will also show the ticket type
Status
Pending
In Progress
Closed
Subject
Message
Time
Three-dot menu
View
Delete
Click on the ticket to view the details and support team's response.
You may also raise a new ticket with the “ New Request” button.
The detailed view will show the following:
Ticket Subject
Ticket Type
Status
Below the subject, you will find a chat section with the messages and attachments in the following format:
Name of the sender
Your name; If you have sent the message
Admin; If the admin has replied to your message
Time When the message was sent
Message content
Files attachments
Below the chat, you will find the reply section:
Type your reply
Attach file if needed
Click on send button
The message will be added in the chat section above
 Log in to Manage Your Account
Access your dashboard to manage and optimize ads.
Check your stats and grow your ad revenue.
Start Growing With 7SearchPPCWant to promote your products, services, or offers.
Want to monetize your website, blog, or social media traffic.
